Steep Turns: Pre-Flight Lesson

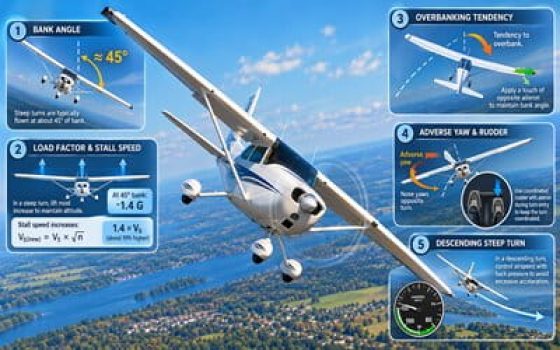
Steep turn training illustration showing bank angle, load factor, overbanking tendency, adverse yaw and descending steep turn
Pre-flight lesson Advanced maneuvers
Lesson objective

This lesson builds directly on the Aircraft Turns lesson . You should already understand how to enter, maintain and recover from a coordinated turn. You will now learn what changes as the bank angle becomes steeper, including load factor, stall speed, overbanking tendency and the control inputs required to enter, maintain and recover from a steep turn.

Why Learn Steep Turns?

Steep turns develop precise aircraft control

Steep turns are practised because they improve coordination and prepare the pilot for situations where a rapid or tight change of direction may be required.

Traffic Avoidance Avoid another aircraft

A steep turn may be used when a rapid change of direction is required to avoid conflicting traffic.

Confined Area Make a canyon turn

Steep-turn skills help the pilot understand how bank angle and airspeed affect turn radius when maneuvering in a confined area.

Descending Turn Make a steep descending turn

A steep descending turn may be used when descending through a suitable opening in cloud while maintaining safe airspeed and avoiding a spiral.

Coordination Develop coordinated control

The maneuver develops coordinated use of aileron, rudder and elevator while controlling altitude, airspeed and bank angle.

Basic Idea

What is a steep turn?

A steep turn is a turn flown at a greater bank angle than a normal turn. In flight training, steep turns are commonly practised at about 45° of bank, although the exact bank angle depends on the training standard and the aircraft.

Main Idea

The basic turn is the same — but the demands increase

The airplane is still banked and coordinated just as it was in the previous lesson on normal turns.

The difference is that a greater bank angle changes the forces acting on the airplane. Maintaining altitude, airspeed and coordination therefore requires more precise control.

Bank Angle The bank is greater

A steep turn uses a larger bank angle than the normal turns you practised earlier.

Altitude More precise pitch control is required

As the bank becomes steeper, the airplane has a greater tendency to lose altitude unless the pilot increases lift.

Coordination The controls must work together

Aileron, rudder and elevator must remain coordinated while the pilot maintains the selected bank angle, altitude and airspeed.

Remember A steep turn is not a completely different maneuver. It is a coordinated turn flown at a greater bank angle, with greater aerodynamic forces and less room for imprecise control.
Forces in a Steep Turn

How does bank angle affect lift and load factor?

As the bank angle increases, the direction of lift changes. To maintain altitude, the airplane must produce more total lift. This also increases the load factor.

Lift in a Bank

Part of the lift moves the airplane into the turn

In straight-and-level flight, lift acts mainly upward and supports the airplane's weight.

When the airplane banks, lift no longer acts only upward. Part of the lift still supports the airplane, while another part acts toward the centre of the turn.

As the bank angle increases, more total lift is required to maintain altitude.

Airplane beginning a bank during a steep turn
As the airplane banks, part of the lift starts to act toward the centre of the turn.
Airplane at a greater bank angle during a steep turn
As the bank angle increases, less of the total lift acts upward.
Airplane established in a steep turn
In a steep turn, more total lift is required to maintain altitude.
Load Factor

What is load factor?

Load factor tells us how much load the airplane is carrying compared with its normal weight. It is expressed in G.

In straight-and-level flight, the load factor is normally 1G. At 2G, the airplane and everything inside it experience about twice the normal load.

In a level turn, load factor increases as the bank angle increases. The increase is small at lower bank angles, but becomes much greater as the bank gets steeper.

30° Bank About 1.15G

At 30° of bank, the increase in load factor is still relatively small.

45° Bank About 1.4G

At 45° of bank, the increase in load factor becomes much easier to notice.

60° Bank 2G

At 60° of bank, the load factor is about twice the normal load in a level coordinated turn.

Important

Stall speed increases too

When load factor increases, stall speed also increases. This means that an airplane can stall at a higher airspeed during a steep turn than during straight-and-level flight.

Remember Greater bank angle → more lift required → higher load factor → higher stall speed.
Aircraft Control

What is overbanking tendency?

In a steep turn, the airplane may tend to keep increasing its bank angle. This is called overbanking tendency.

Basic Idea

The airplane may keep rolling into a steeper bank

Overbanking tendency means that the bank angle may keep increasing unless the pilot stops it.

This is more noticeable in steeper turns, which is why the pilot must pay close attention to the bank angle throughout the maneuver.

Overbanking tendency in a steep turn showing the inside and outside wing paths
The outside wing travels farther and slightly faster than the inside wing, which can make the bank angle increase.
Why It Happens

During a turn, the outside wing follows a larger circle than the inside wing.

Because it travels farther in the same amount of time, the outside wing moves slightly faster.

This can let the outside wing produce slightly more lift, which can make the airplane continue rolling into a steeper bank.

Outside Wing Travels farther

The outside wing follows a larger circle during the turn.

Speed Moves slightly faster

Because it travels farther in the same time, the outside wing moves slightly faster than the inside wing.

Result Bank angle may increase

The airplane may tend to keep rolling into a steeper bank unless the pilot holds the desired bank angle.

Control

Hold the bank angle you want

After the desired bank angle is reached, a small amount of opposite aileron may be required to keep the bank angle from increasing.

Remember In a steep turn, reaching the correct bank angle is not enough. You must also prevent the bank angle from continuing to increase.
Coordination

What is adverse yaw?

Adverse yaw happens when you use the ailerons to roll the airplane. The airplane begins to roll in the direction you want, but the nose may briefly move in the opposite direction.

Overbanking Tendency The bank angle keeps increasing

This affects the airplane's bank after the turn becomes established.

Adverse Yaw The nose moves the wrong way

This happens mainly while the ailerons are being used to roll the airplane.

Adverse yaw during a left turn showing the right wing producing more drag and the nose yawing right
During a left roll, the right aileron moves down and creates more drag. This can make the nose move to the right, opposite to the direction of the roll.
Why It Happens

Ailerons can create different amounts of drag

When the pilot moves the ailerons, one aileron moves up and the other moves down.

The wing with the down aileron usually produces more lift, but it also produces more drag.

This difference in drag can make the nose move in the direction opposite to the roll.

Example: Left Turn

The airplane rolls left, but the nose tends to move right

To start a left turn, the left aileron moves up and the right aileron moves down.

The right wing produces more drag. This can make the nose move slightly to the right, even though the airplane is rolling to the left.

That unwanted movement of the nose is adverse yaw.

Why Rudder Is Needed

Rudder keeps the airplane coordinated

Rudder is used as required to prevent the nose from moving in the wrong direction while the airplane is rolling.

For example, while rolling into a left turn, some left rudder may be required to keep the nose moving correctly with the turn.

The exact amount of rudder depends on the airplane and the situation. Use only the amount needed to keep the airplane coordinated.

Remember Overbanking changes the bank angle. Adverse yaw moves the nose. Rudder is used to control adverse yaw and keep the airplane coordinated.
Steep Turn Procedure

How to perform a steep turn — step by step

A good steep turn is smooth and controlled. The pilot must control the bank angle, altitude, airspeed and coordination while continuing to look outside for other traffic.

Before flying the maneuver: use the bank angle, entry airspeed and power setting recommended for your aircraft and taught by your instructor. Steep turns in light-aircraft training are often practised at about 45° of bank.

Before you start

1 · Lookout Make sure the area is clear

Check carefully for other aircraft and complete the clearing procedure taught by your instructor.

2 · Aircraft Start from stable flight

Be straight and level at the correct entry airspeed. Check your altitude, airspeed and heading before beginning the turn.

3 · Reference Choose an outside reference

Choose a clear reference ahead and note your heading. This will help you judge the turn and the rollout.

Phase 1 Enter the steep turn
1
Roll into the turn

Use smooth aileron input to begin the roll. Use rudder as required to keep the airplane coordinated.

Keep your main attention outside and use the horizon to judge the developing bank angle.

2
Increase back pressure

As the bank angle increases, smoothly increase back pressure to keep the airplane from descending. More lift is required in the steeper bank.

3
Add power as required

A steep turn creates more drag. Add power as needed to maintain the required airspeed and altitude. The exact amount depends on the aircraft.

4
Hold the bank angle

As you reach the chosen bank angle, reduce the aileron input used to enter the turn and bring the ailerons close to neutral.

Make a quick instrument check to confirm the bank angle, altitude and airspeed, then return your eyes outside.

If the airplane still tries to roll into a steeper bank, use a small amount of opposite aileron to hold the chosen bank angle.

Opposite Aileron

In a left steep turn, for example, this means using a small amount of right aileron if the bank keeps increasing. You are not trying to level the wings — only to stop the bank from becoming steeper.

Phase 2 Maintain the steep turn
5
Use outside references

Keep most of your attention outside. Use the horizon and the position of the nose and wings to judge the airplane's attitude and bank angle.

Continue looking for other aircraft throughout the turn.

6
Scan the instruments

Make frequent but brief instrument checks. Do not stay focused inside the cockpit.

Check the altimeter for altitude, the airspeed indicator for airspeed, and the attitude indicator to confirm the bank angle.

Check the VSI for an unwanted climb or descent and the slip/skid indicator to confirm that the turn remains coordinated.

Visual Scan

Keep repeating a simple scan: outside → instruments → outside. The outside view remains your main reference.

7
Make small corrections

If the altitude, airspeed or bank angle begins to change, make a small correction early rather than waiting for the error to become larger.

Keep the airplane coordinated and avoid large or abrupt control movements.

Phase 3 Roll out of the turn
8
Plan the rollout

Look toward your outside reference as you approach the end of the turn.

Make a quick heading indicator check to confirm your position relative to the target heading.

Begin the rollout before reaching the target because the airplane continues turning while the wings are returning to level.

9
Roll the wings level

Use smooth aileron in the opposite direction to roll the wings level.

Use rudder as required to keep the airplane coordinated during the rollout.

10
Relax back pressure

As the bank angle decreases, smoothly reduce the extra back pressure. Otherwise, the airplane may climb as the wings become level.

Reduce any extra power as required as you return to straight-and-level flight.

11
Check and stabilize

Once the wings are level, check the heading, altitude and airspeed.

Adjust pitch and power as required, return to stable straight-and-level flight and re-trim the airplane if necessary.

Rollout Rule of Thumb

Start the rollout before the target heading

A common starting rule is to begin the rollout about half the bank angle before the target heading.

For example, with a 45° bank, you might begin the rollout about 20–25° before the desired heading.

This is only a rule of thumb. The correct lead depends on the airplane, the rate of turn and how quickly you roll the wings level.

Remember Look outside → roll smoothly → increase back pressure → add power as required → hold the bank → scan outside and instruments → make small corrections → lead the rollout → return to straight-and-level flight.
Safety Reminder

Before practising steep turns

Before each steep turn, make sure you have enough space, altitude and airspeed to complete the maneuver safely.

Lookout Clear the area

Check carefully for other aircraft before starting and continue your lookout during the maneuver.

Safety Margin Protect altitude and airspeed

Start at a suitable altitude and airspeed. Remember that stall speed increases as load factor increases.

Loss of Control Stop the maneuver if necessary

If the bank or descent is becoming difficult to control, reduce the bank toward wings level and recover as taught by your instructor.

Remember Clear area · Safe altitude · Safe airspeed · Stay coordinated · Respect aircraft limits.
Application

Steep descending turns

In a steep descending turn, the airplane is both banking and descending. The main challenge is to control the descent without allowing the airspeed to increase too much.

Airspeed Control

How do you keep the airspeed constant?

During a descent, the airplane can accelerate if the nose is allowed to move too far down.

Use pitch to control the airspeed, while adjusting power as required to control the descent. At the same time, keep the selected bank angle from increasing.

Pitch Control the airspeed

Use small pitch changes to keep the target airspeed. If the nose is too low, the airplane will tend to accelerate.

Power Control the descent

Adjust power as required to obtain the desired descent while keeping the selected airspeed.

Bank Hold the bank angle

Keep the selected bank angle and prevent the airplane from continuing to roll into a steeper turn.

Correct the airspeed early

Check the airspeed during your normal outside → instruments → outside scan and make small corrections before the speed moves far from the target.

Airspeed Increasing Raise the nose slightly

If the airspeed begins to increase, raise the nose slightly to reduce the acceleration.

Adjust power as required while maintaining the selected bank angle.

Airspeed Decreasing Lower the nose slightly

If the airspeed begins to decrease, lower the nose slightly to regain the target speed.

Adjust power as required while keeping the descent smooth and controlled.

During the Turn

Keep all three under control

Pitch: maintain the target airspeed.

Power: adjust the rate of descent as required.

Bank: maintain the selected bank angle and prevent overbanking.

Watch for a Spiral

A falling nose and increasing bank are warning signs

If the bank angle increases while the nose continues to drop, the airplane can accelerate rapidly and develop into a descending spiral.

Do not simply pull harder while remaining in an excessive bank. Reduce the bank toward the desired angle — or toward wings level if necessary — and regain control of the pitch and airspeed.

Remember Pitch → airspeed · Power → descent · Bank → turn. Keep all three under control.
Additional Training

Airplane Maneuvers Mastery — Private Pilot

Want to see steep turns demonstrated in flight? Pilot Institute's Airplane Maneuvers Mastery course provides additional practical training on steep turns and other private pilot maneuvers.

View the Training Lesson →

Paid training course. Affiliate link — StudyFlight may earn a commission from qualifying purchases at no additional cost to you.

Check Your Knowledge

Question Reviews

Before the flight, make sure you can explain the main ideas and procedures without looking back at the lesson.

1. Why is more lift required as the bank angle increases in a level steep turn?

As the airplane banks, part of the lift acts toward the centre of the turn instead of directly upward. More total lift is therefore required to maintain altitude.

2. What happens to load factor and stall speed as the bank angle increases?

In a level turn, the load factor increases as the bank becomes steeper. The higher load factor also causes the stall speed to increase.

3. What is overbanking tendency, and how do you control it?

Overbanking tendency is the tendency for the airplane to continue rolling into a steeper bank. After reaching the selected bank angle, bring the ailerons close to neutral and use a small amount of opposite aileron if required to prevent the bank from increasing.

4. What is adverse yaw, and how is it controlled?

Adverse yaw is the tendency for the nose to move opposite to the direction of roll when the ailerons are used. Use rudder as required during the roll to keep the airplane coordinated.

5. What control changes are normally required when entering a level steep turn?

Roll smoothly toward the selected bank with aileron and coordinated rudder. As the bank increases, increase back pressure to maintain altitude and add power as required to maintain the desired airspeed.

6. Where should your attention be during a steep turn, and which instruments should you check?

Most of your attention should remain outside, using the horizon and looking for traffic. Make brief instrument checks of altitude, airspeed, bank angle, vertical speed and coordination, then return your eyes outside.

7. When should you begin the rollout from a 45° steep turn?

A useful starting rule is to begin the rollout about half the bank angle before the target heading. At 45° of bank, this is approximately 20–25° before the desired heading. Adjust the lead as required for the airplane and rate of rollout.

8. During a steep descending turn, how do you maintain the desired airspeed?

Use pitch to maintain the desired airspeed and adjust power as required for the desired descent. If the airspeed increases, raise the nose slightly; if it decreases, lower the nose slightly.

9. What are the warning signs that a steep descending turn may be developing into a spiral?

The bank angle continues to increase, the nose drops, and the airspeed begins to increase rapidly. Reduce the excessive bank and regain control of the pitch and airspeed.

Before the Flight You should be able to explain how to prepare for, enter, maintain and roll out of a steep turn, how to use outside references and instrument checks, and how to control a steep descending turn.

Tags:

error:
Study flight
Logo