In this lesson, you will learn what a slip is, the difference between a side slip and a forward slip, and when each one is used. You will also learn how to enter, maintain and recover from each maneuver safely. The lesson builds on the basic control of pitch, airspeed and descent covered in the Descending lesson .
Slips give you more control of the airplane's flight path
A slip uses aileron and opposite rudder together. Depending on how it is used, it can help you correct for crosswind or lose altitude more quickly without allowing the airspeed to increase excessively.
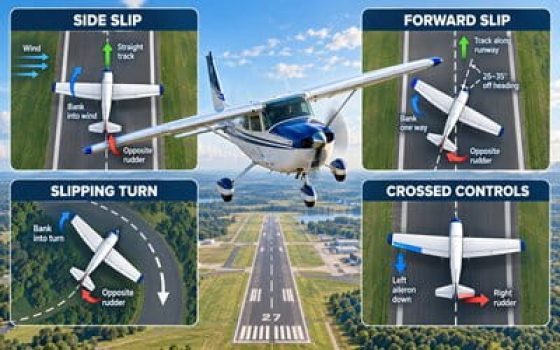
A side slip can keep the airplane aligned with the runway while the bank counters the effect of the wind.
A forward slip can help lose extra altitude on approach without building excessive airspeed.
During a slip, aileron and rudder are deliberately used in opposite directions to control how the airplane moves through the air.
Practising slips helps you understand how aileron, rudder, elevator and power affect the airplane when the controls are intentionally not coordinated.
What is a slip?
A slip happens when the airplane is banked in one direction while rudder is applied in the opposite direction. Unlike a normal coordinated turn, the controls are intentionally crossed.
Bank the airplane — then use opposite rudder
Normally, when an airplane banks, it begins to turn. In a slip, opposite rudder is used to reduce or prevent that turn.
The airplane is therefore no longer moving through the air in the same way as during coordinated flight. This creates additional drag and allows the pilot to control the airplane's track, heading or rate of descent depending on the type of slip being used.
Aileron is used to lower one wing and establish the desired bank angle.
Rudder is applied in the opposite direction to control the nose and reduce or prevent the airplane from turning.
Because bank and rudder oppose each other, the airplane moves through the air at an angle and produces more drag.
A slip is an intentional uncoordinated condition. This is different from normal flight, where aileron and rudder are normally used together to keep the airplane coordinated.
Side Slip vs Forward Slip: What's the Difference?
A side slip and a forward slip use the same basic idea: bank in one direction and apply rudder in the opposite direction. The main difference is what the pilot is trying to control.


The controls are similar — the purpose is different
In both maneuvers, the pilot uses aileron in one direction and rudder in the opposite direction.
In a side slip, the main objective is usually to control drift. In a forward slip, the main objective is usually to increase drag and rate of descent while maintaining the desired ground track.
How to Perform a Side Slip — Step by Step
On approach in a crosswind, use the side slip to control drift while keeping the airplane's longitudinal axis aligned with the desired flight path.
Establish the bank and opposite rudder smoothly.
Use aileron to bank the airplane toward the wind.
The bank is used to counter the sideways drift caused by the crosswind.
At the same time, apply rudder opposite to the bank.
Use the rudder to prevent the airplane from turning toward the lowered wing and to maintain the required heading.
Use pitch to maintain the required approach airspeed.
Use power as required to control the rate of descent during the approach.
Keep correcting drift and heading independently.
Adjust the bank as required to keep the airplane on the desired ground track.
If the wind continues to move the airplane sideways, adjust the bank into the wind.
Adjust the opposite rudder as required to keep the airplane's longitudinal axis aligned with the desired heading.
As the amount of bank changes, the amount of opposite rudder required may also change.
Continue to use pitch to control the approach airspeed and power to control the rate of descent.
Keep your main attention outside while making brief instrument checks as required.
Remove the crossed controls smoothly.
Smoothly release the rudder pressure while leveling the wings.
These control changes should be made together so that the airplane returns smoothly toward coordinated flight.
Adjust the pitch attitude as required to resume the normal descent or the attitude required for the next phase of flight.
How to Perform a Forward Slip — Step by Step
A forward slip is mainly used when the airplane is too high on approach and the pilot needs to increase the rate of descent without allowing the airspeed to increase excessively.
Increase drag while keeping the desired ground track.
Reduce power as required for the approach. In many training situations, this may be idle power.
Use the power setting recommended for your airplane and the procedure taught by your instructor.
Use aileron to establish a moderate bank.
The direction of bank is chosen so that the airplane can remain on the desired ground track while the slip is established.
Apply rudder opposite to the bank. The nose will move away from the direction of the ground track.
This crossed-control condition increases drag and allows the airplane to descend more steeply.
Use pitch to maintain the required approach airspeed.
If the airspeed begins to increase, raise the nose slightly. If it begins to decrease, lower the nose slightly as required.
Keep the airplane on the desired ground track while controlling descent and airspeed.
Look outside and keep the airplane moving along the desired track toward the runway.
The airplane's heading will not be the same as its ground track during the slip.
Increase or decrease the crossed-control input as required to change the amount of drag and the rate of descent.
More slip generally produces more drag and a greater rate of descent.
Continue to control the airspeed with pitch while keeping most of your attention outside.
Make brief instrument checks, but remember that some airplanes can show airspeed indication errors while in a slip. We will look at this later in the lesson.
Return smoothly to normal approach flight.
Smoothly reduce the opposite rudder while leveling the wings.
Bring the airplane's heading back into alignment with the desired flight path.
Adjust pitch and power as required to resume the normal approach attitude, airspeed and descent path.
The forward slip should normally be removed before touchdown so that the airplane is properly aligned for landing.
In a forward slip, the airplane's nose is intentionally not aligned with the ground track. Before touchdown, remove the slip and establish the landing attitude and alignment required for your airplane and the conditions.

Slipping Turn
A slipping turn uses the same basic crossed-control principle as a forward slip, but the airplane is allowed to continue turning while descending.
The airplane keeps turning — but more slowly
Bank is maintained to continue the turn while opposite rudder reduces the rate of turn without stopping it completely.
At the same time, the slip increases drag and can produce a greater rate of descent without allowing the airspeed to increase excessively.
A slipping turn may be useful when extra altitude needs to be lost while the airplane is already turning.
One possible use is during a turn toward final, particularly when managing excess altitude during a forced-landing approach.
Recover in the same general way as from a forward slip: smoothly reduce the opposite rudder, level the wings as required, and adjust pitch to return to the desired flight condition.
Instrument Indications & Airspeed Errors
During a slip, the airplane is intentionally uncoordinated. Several instruments will therefore show indications that are different from normal coordinated flight.
The turn coordinator shows the airplane banked, while the inclinometer ball moves away from the centered position because the airplane is intentionally slipping.
With opposite rudder applied, the ball will normally move toward the side opposite the rudder input.
During a forward slip or slipping turn, the altimeter shows the loss of altitude while the vertical speed indicator may show a greater rate of descent.
The attitude indicator shows the airplane banked in the same direction as the aileron input.
It does not show whether the flight is coordinated; the inclinometer ball provides that information.
In some airplanes, a slip changes the airflow around the pitot tube or static ports.
This can create a noticeable error in the indicated airspeed.
Do not assume the ASI always reads high or always reads low
The direction and amount of airspeed error during a slip depend on the design of the airplane and the location of its pitot and static system.
One airplane may show a different error from another, and the indication may also change with the direction or amount of slip.
For this reason, do not memorize a rule such as “the airspeed indicator always over-reads” or “always under-reads” during a slip.
Maintain the recommended approach speed and use the outside visual picture together with appropriate instrument checks. Follow the procedures and limitations in the aircraft's POH/AFM and the technique taught by your flight instructor.
Safety & Common Errors
Slips are useful maneuvers, but they are intentionally uncoordinated. They require good airspeed control, smooth control inputs and a clear understanding of the difference between a slip and a skid.
Do not confuse a slip with a skid
In an intentional slip, the airplane is banked one way while rudder is applied in the opposite direction.
A skid is different. It can occur when excessive rudder is applied in the direction of a turn, forcing the nose around faster than the airplane's natural rate of turn.
This is especially dangerous during a low-altitude base-to-final turn. Never use excessive inside rudder to force the airplane back toward the runway after overshooting final.
A slip does not prevent a stall. The airplane will still stall if the critical angle of attack is exceeded.
Maintain the recommended approach speed and avoid pulling back excessively while the controls are crossed.
Enter and recover from the slip smoothly. Sudden rudder, aileron or elevator movements can create rapid changes in attitude and angle of attack.
Rudder should not be used aggressively to make up for a poorly planned approach or to force the airplane around a turn.
If the approach becomes unstable, a go-around may be the better choice.
Slips are primarily flown using outside visual references. Keep track of the runway, ground track and airplane attitude, with brief instrument checks as required.
In a forward slip, the airplane's longitudinal axis is not aligned with its ground track.
Remove the forward slip in time to establish the proper landing alignment and avoid unnecessary side loads on the landing gear.
Some airplanes have limitations or cautions concerning slips with certain flap settings.
Always check the aircraft's POH/AFM before using a forward slip, especially with flaps extended.
The main danger is not simply that the airplane is uncoordinated. The danger increases if the airplane stalls while significant yaw is present.
Avoid high angle of attack, excessive rudder and abrupt control inputs. This is particularly important close to the ground, where there may be very little altitude available for recovery.
Forward slip and side slip are not treated the same at touchdown
A forward slip used to lose altitude is normally removed before touchdown so that the airplane can be properly aligned for landing.
A side slip used for a crosswind landing may, when appropriate for the airplane and conditions, be maintained into the landing so that drift remains controlled and the longitudinal axis stays aligned with the runway.
Question Reviews
Before the flight, make sure you can explain the difference between the types of slip and describe how to enter, maintain and recover from them safely.
1. What control inputs create a slip?
A slip is created by banking the airplane in one direction with aileron while applying rudder in the opposite direction. The airplane is intentionally uncoordinated.
2. What is the main difference between a side slip and a forward slip?
The control condition is similar, but the purpose is different. A side slip is mainly used to control drift, especially during a crosswind landing. A forward slip is mainly used to increase drag and lose excess altitude.
3. During a side slip for a crosswind landing, what do the ailerons and rudder control?
Use the ailerons to control drift and the rudder to control heading. Bank into the wind as required to remain on the desired ground track, and use opposite rudder to keep the airplane properly aligned.
4. How do you enter and maintain a side slip?
Bank into the wind and apply opposite rudder. Adjust the bank to control drift and the rudder to control heading. Use pitch to maintain the required approach airspeed and adjust power as required for the desired descent.
5. How does a forward slip help when the airplane is too high on approach?
The crossed controls increase drag, allowing the airplane to descend more steeply without a large increase in airspeed. The pilot maintains the desired ground track while the airplane's heading is intentionally different from that track.
6. What is a slipping turn?
A slipping turn is a slip performed while the airplane continues turning. Opposite rudder reduces the rate of turn without stopping it completely, while the additional drag helps increase the rate of descent.
7. Can you always trust the airspeed indicator to read normally during a slip?
No. In some airplanes, the airflow around the pitot tube or static ports can be affected during a slip. This can cause an airspeed indication error. The size and direction of the error depend on the airplane.
8. Why is a skid during the base-to-final turn dangerous?
A skid can occur when excessive rudder is used in the direction of the turn. If the airplane then stalls while significant yaw is present, it can develop into a spin. This is especially dangerous close to the ground.
9. What should you check before performing a forward slip with flaps extended?
Check the airplane's POH/AFM. Some airplanes have limitations or cautions concerning slips with certain flap settings.
10. How do you recover from a slip?
Smoothly reduce the rudder input while leveling the wings, then adjust pitch and power as required for the next phase of flight. After a forward slip, make sure the airplane is properly aligned before touchdown.
Airplane Maneuvers Mastery — Private Pilot
Want to go further with practical airplane maneuvers? Pilot Institute's Airplane Maneuvers Mastery course provides additional training and in-flight demonstrations for private pilot maneuvers.
View the Training Lesson →Paid training course. Affiliate link — StudyFlight may earn a commission from qualifying purchases at no additional cost to you.