Aircraft taxiing is the controlled movement of an airplane on the ground under its own power. The objective of this practical preflight lesson is to review the basic techniques and procedures used during taxiing, including starting to move, checking the brakes, steering with the rudder pedals, controlling taxi speed and maintaining safe clearance from people, aircraft and obstacles.
Look Outside Before Releasing the Brakes
Taxiing starts before the airplane moves. Take a moment to look outside and make sure the path ahead and the area around the aircraft are clear.
Check Your Path
Make sure the direction you intend to taxi is clear of people, vehicles, equipment and other aircraft.
Check the Whole Aircraft
Remember that the wings extend well beyond the cockpit. Check both sides and allow enough clearance for the wingtips and tail.
Have a Taxi Plan
Before moving, know the first part of your taxi route and where you expect to stop, turn or hold.
Getting the Airplane Rolling
Starting the airplane moving may require a little more power than is needed to keep it rolling. Once the airplane begins to move, reduce the power so it does not accelerate unnecessarily.
The Basic Sequence
Release the brakes and confirm that the path remains clear.
Add only enough throttle to start the airplane moving.
Once the airplane begins rolling, reduce the throttle promptly to prevent unnecessary acceleration.
Test the Brakes Immediately
Do not wait until you reach a taxiway or an obstacle to find out whether the brakes work. Check them as soon as the airplane starts moving.
How to Check the Brakes
How to Steer During Aircraft Taxiing
On the ground, the airplane is steered primarily with the rudder pedals, with braking used when needed to assist directional control and manage speed.
Turn With Your Feet
To turn left, press the left rudder pedal. To turn right, press the right rudder pedal.
As you approach the direction you want, reduce the pedal pressure and use opposite pressure if necessary to stop the turn.
Use Brakes Only as Needed
Differential braking can help tighten a turn or maintain directional control at very low speed.
Avoid using continuous brake pressure to control normal taxi speed. Use the throttle first to prevent the airplane from accelerating unnecessarily.
Taxi Slowly Enough to Stop Promptly
There is no single taxi speed that is correct for every situation. On a busy ramp, near other aircraft or when approaching a turn, taxi more slowly. Reduce speed before entering a turn rather than braking heavily during it.
A useful rule: taxi slowly enough that closing the throttle allows you to stop the airplane promptly.Do Not Taxi by Looking Only Straight Ahead
Keep scanning ahead and to both sides while taxiing. Your attention should remain primarily outside the cockpit so you can detect aircraft, vehicles, people, signs, obstacles and changes in your taxi route.
Follow the Taxiway Centerline
When a taxiway centerline is provided, keep the aircraft centered over the line. This helps maintain predictable spacing from taxiway edges, signs, lights and nearby obstacles.
Do Not Chase the Line Under the Nose
Look ahead along the taxiway rather than staring at the pavement immediately in front of the airplane.
Small rudder-pedal corrections are usually enough to keep the airplane tracking along the centerline.
Learn What “Centered” Looks Like
From the left seat, the pilot is not sitting on the airplane's centerline. The taxiway line may therefore appear slightly offset from the pilot's seating position.
Use the visual reference demonstrated by your instructor for the aircraft you are flying.
Making a Taxi Turn
A good taxi turn starts before the airplane reaches the corner. Reduce speed first, turn with the rudder pedals and then straighten the airplane smoothly on the new taxi path.
Slow Before the Turn
Reduce throttle before turning. Enter the turn slowly enough that heavy braking is not required while the airplane is changing direction.
Turn With the Pedals
Apply rudder-pedal pressure in the direction of the turn. Use differential braking only when needed for a tighter turn or additional directional control.
Straighten Early
As the airplane approaches the new taxi direction, reduce the pedal pressure and use a small opposite correction if necessary to stop the turn.
The Cockpit Is Not the Widest Part of the Airplane
During a turn, continue checking both sides of the airplane. The wings follow a different path from the nose, so leave generous clearance from parked aircraft, vehicles, signs, buildings and other obstacles. If clearance is uncertain, stop rather than continue guessing.
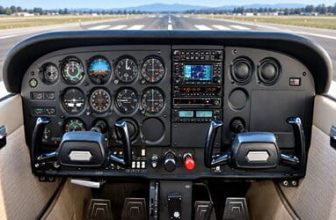
Check the Flight Instruments
Taxiing provides an opportunity to confirm that the flight instruments respond normally before takeoff. Follow the aircraft checklist and use brief instrument checks while the airplane is moving and turning.
Turn Coordinator
During a taxi turn, confirm that the turn indication moves in the same direction as the turn and that the ball moves toward the outside of the turn.
Heading Indicator and Compass
Confirm that the indicated heading changes in the correct direction as the airplane turns. When taxiing straight, compare the heading indicator with the magnetic compass as appropriate.
Attitude Indicator and VSI
The attitude indication should be appropriate for the airplane sitting on the ground, with no warning flags, and the vertical speed indicator should indicate approximately zero.
Airspeed Indicator
During normal taxi, the airspeed indicator should remain at or near zero. Wind and instrument sensitivity may produce a small indication.
Instrument Checks Are Brief Glances
Checking the instruments does not mean looking inside the cockpit for an extended period while the airplane is moving. Keep the primary visual attention outside and perform the checks when the taxi situation allows it.
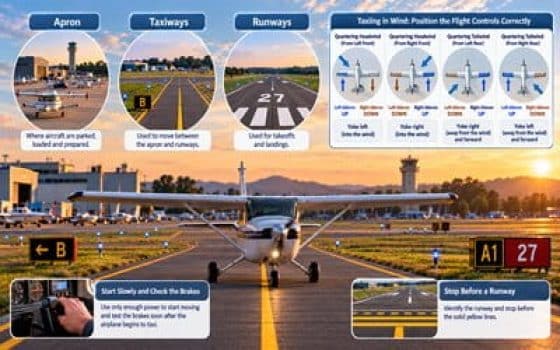
Aircraft Taxiing in Wind: Position the Flight Controls Correctly
Wind can act on the wings and tail even while the airplane is on the ground. During taxi, position the flight controls so that the wind is less likely to lift a wing or affect the airplane's stability.
Before taxiing in wind, identify where the wind is coming from. Then position the ailerons and elevator for that wind direction and adjust them as the airplane changes direction.
Wind From the Left Front
Wind from the left front: turn the yoke left.
Wind From the Right Front
Wind from the right front: turn the yoke right.
Wind From the Left Rear
Wind from the left rear: yoke right and forward.
Wind From the Right Rear
Wind from the right rear: yoke left and forward.
Headwind: Into It. Tailwind: Away From It.
The Wind Direction Changes Relative to the Airplane
Do not set the controls once and forget them. As you turn onto another taxiway, the wind may move from a headwind to a crosswind or tailwind relative to the airplane. Reposition the controls as the airplane changes direction.
Know Where to Stop Before a Runway
During aircraft taxiing, approaching a runway requires extra attention to signs, markings and holding positions. The aircraft must remain under control and be ready to stop before entering the protected runway area.
The parking and servicing area where the taxi normally begins.
The route used to move between the apron and the runway.
The surface used for takeoff and landing. Enter it only when appropriate and authorized.
Prepare to Stop Before You Reach the Runway
Identify the Runway Ahead
Keep looking outside for runway signs, surface markings and the point where the taxiway approaches the runway.
Reduce Taxi Speed
Slow the airplane before reaching the holding position so that stopping does not require abrupt braking.
Find the Hold Short Marking
Look for the four yellow lines across the taxiway: two solid lines and two dashed lines.
Recognize the Runway Holding Position Marking
When approaching a runway from a taxiway, the two solid yellow lines are on the side where the aircraft must hold. Stop before those solid lines unless you are authorized to proceed.
Two Solid Lines
If the solid lines are facing you, you are approaching the protected runway area. This is the holding side of the marking.
Two Dashed Lines
The dashed lines are on the runway side of the marking. When leaving a runway, the aircraft is not fully clear until the entire airplane has crossed the holding position marking.
Do Not Assume You Can Cross
Wait for an Explicit Clearance
At an airport with an operating control tower, do not cross a runway holding position marking unless ATC has specifically authorized you to enter or cross that runway.
Check the Runway Before Crossing
Check carefully in both directions for arriving, departing or taxiing traffic and follow the published airport and radio procedures before entering or crossing the runway.
Look Even When You Have a Clearance
Before moving onto a runway, visually check for conflicting traffic. If your position, taxi route or clearance is not clear, stop and ask for clarification rather than continuing while uncertain.
The Holding Position Marking Is Similar
Canadian runway holding position markings also use two solid and two dashed yellow lines. In Canadian radiocommunications, the runway holding position may also be referred to as the holding point.
If You Are Not Sure, Stop
A moment of uncertainty while taxiing is a reason to stop the airplane, confirm your position and clarify the instruction. Never continue toward a runway while guessing where you are supposed to go.
Parking and Securing the Airplane
Taxiing is not finished until the airplane is safely positioned in its parking area. Approach the parking position slowly, remain aware of nearby aircraft, people and equipment, and follow the airport's parking guidance and the aircraft checklist.
Slow Down Before Parking
Reduce power early and approach the parking position at a slow walking pace. Keep looking outside and allow enough clearance for the wings and tail.
Stop in the Correct Position
Follow painted parking guidance or ground personnel when available. Stop the airplane smoothly without using unnecessary power against the brakes.
Secure the Airplane
Hold the Brakes
Keep the airplane stationary while completing the appropriate shutdown actions.
Follow the Shutdown Checklist
Complete the engine and electrical shutdown using the checklist for the aircraft you are flying.
Secure the Aircraft
Use the parking brake, wheel chocks or tie-downs as appropriate for the aircraft, conditions and parking area.
Install the Control Lock
After shutdown, install the control lock when required to protect the flight controls from wind movement.
Park Into the Wind When Practical
When you have a choice of parking direction, positioning the airplane into the wind can reduce the effect of the wind on the aircraft. Always give priority to the designated parking arrangement and local procedures.
Use the Checklist for the Airplane You Fly
Shutdown and securing procedures are not identical for every airplane. Follow the aircraft's POH or checklist and your instructor's procedures rather than relying on a generic sequence alone.
Make the Transfer of Controls Clear
During flight training, there must never be uncertainty about who is controlling the airplane. A positive verbal exchange confirms when control passes between the student and instructor.
Do not release the controls until the other pilot has positively acknowledged, “I have control.” Likewise, do not take control until you are ready and the transfer has been clearly confirmed.
Review Questions
Before the flight, use these questions to check that the main taxiing procedures and control movements are clear.
1 What are the three main aerodrome areas introduced in this lesson?
2 Where should your attention be directed while taxiing?
3 What should you do with the throttle once the airplane begins moving?
4 When should the brakes be checked?
5 How is the airplane steered while taxiing?
6 With a quartering headwind from the left, how should the yoke be positioned?
7 With a quartering tailwind from the right, how should the controls be positioned?
8 What should you do when approaching a runway holding position?
9 What should you do if you are unsure of your taxi route or an ATC instruction?
10 How should control of the airplane be transferred between pilots?
What You Should Remember Before Your Flight
Look outside before moving. Check the path, the wings and the area around the airplane.
Start slowly and test the brakes. Do this early, before continuing the taxi.
Steer with your feet. Use the rudder pedals and apply braking only as needed.
Keep your eyes outside. Instrument checks during taxi should be brief glances.
Correct for the wind. Headwind: yoke into the wind. Tailwind: yoke away from the wind and forward.
Never guess near a runway. If the route, marking or instruction is unclear, stop.
Taxiing Is a Continuous Outside Scan
Good taxiing is not simply moving the airplane from one place to another. It requires continuous awareness of speed, direction, wind, wingtip clearance, other traffic and the airport environment. Keep the airplane slow, stay ahead of where it is going and stop whenever the situation is unclear.
What Comes After Aircraft Taxiing?
Continue with the next lesson in the StudyFlight training sequence, or review lessons that are directly connected with aircraft taxiing and the transition from ground operations to flight.
Aircraft Attitude: Pitch, Bank & Yaw
Move from ground operations to the basic concepts used in flight: aircraft attitude, pitch, bank, roll and yaw.
Related to TaxiingAncillary Controls
Review throttle, mixture, carburetor heat and the engine controls used before and during ground operations.
From Taxi to RunwayNormal Takeoff
See how ground operations continue after taxiing and holding short, from entering the runway to beginning the takeoff.
FAA Airplane Flying Handbook
The FAA Airplane Flying Handbook expands on ground operations, aircraft taxiing procedures and the flight maneuvers introduced throughout these pre-flight lessons.
View the Airplane Flying Handbook Affiliate link — StudyFlight may earn a commission if you purchase through this link, at no additional cost to you.