Airport Traffic Pattern (Circuit): Complete Pre-Flight Lesson

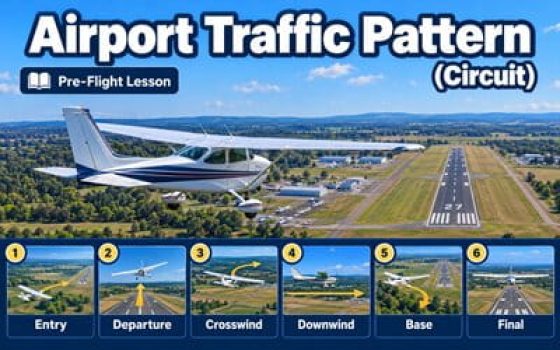
Airport traffic pattern (circuit) pre-flight lesson showing a Cessna above a runway with entry, departure, crosswind, downwind, base, and final approach stages.
Pre-flight lesson Takeoff & Circuit
Lesson Objective

This pre-flight lesson explains how an airport traffic pattern (also called a circuit) is organized and flown in the United States.

You will learn the five main legs of a standard traffic pattern, how to recognize left-hand and right-hand patterns, and how altitude, spacing, visual references and wind affect flight around an airport.

The lesson also covers traffic pattern entry, the sequence of a normal circuit, radio communications at non-towered airports, operations at towered airports, departures, go-arounds and common errors.

It builds on the Normal Takeoff Pre-Flight Lesson and the Crosswind Takeoff Pre-Flight Lesson . Always follow applicable regulations, published airport procedures and ATC instructions, and use the approved AFM/POH for aircraft-specific speeds and configurations.

Understand How the pattern works

Identify the five pattern legs, traffic direction, and the role of pattern altitude and spacing.

Practice Flying a predictable circuit

Follow a logical sequence for entering, flying, and leaving the traffic pattern.

Communicate With other airport traffic

Understand when to make position calls and how tower instructions affect your flight.

Why Study Traffic Patterns?
Predictable flight paths help pilots see, anticipate and avoid other traffic

Takeoffs and landings bring airplanes together in a relatively small area. A standard traffic pattern gives pilots a shared way to organize their movements near the runway.

For a student pilot, learning the pattern means more than memorizing its legs. It means maintaining awareness of other aircraft, using clear visual references and making timely decisions as the flight develops.

Traffic Pattern Basics

What Is an Airport Traffic Pattern (Circuit)?

In U.S. flight training, an airport traffic pattern (or circuit) describes the flight paths airplanes follow close to an airport during takeoff and landing operations. Unlike a route between airports, it is normally shown as a roughly rectangular path around the landing runway.

Core Concept The runway is the reference for the entire pattern.

Each part of the pattern is called a leg. Its name describes the airplane's location or direction of flight relative to the runway. If a different runway is used, the orientation of the pattern changes with it.

Pattern Shape Rectangular does not mean rigid

The familiar rectangle is a teaching model. The actual width and length can vary with aircraft performance, wind, traffic and local procedures. Pilots do not turn at identical distances at every airport.

Pattern Use Not every flight completes the rectangle

An arriving airplane may join the pattern partway through. A departing airplane may leave the airport area without flying every leg. A straight-in arrival may also approach directly to final rather than fly a complete pattern.

Important "Departure leg" and "upwind leg" are not interchangeable.

Some training materials use these names loosely, but U.S. traffic pattern terminology distinguishes them. The next section shows the pattern legs and explains the difference.

Traffic Pattern Layout

The Five Legs of a Standard Traffic Pattern

A standard airport traffic pattern has five main legs: departure, crosswind, downwind, base and final approach. Their positions relative to the runway help pilots identify nearby traffic and follow the sequence of the pattern.

01
Departure Leg

The flight path immediately after takeoff, continuing straight ahead along the extended runway centerline. It leads away from the departure end of the runway.

02
Crosswind Leg

A flight path approximately perpendicular to the runway, beyond its departure end. It connects the departure side of the pattern to the downwind side.

03
Downwind Leg

A flight path parallel to the runway, in the opposite direction to landing. The runway remains off one side of the airplane.

04
Base Leg

A flight path approximately perpendicular to the runway near its approach end. It links the downwind leg to the final approach path.

05
Final Approach

The flight path aligned with the extended runway centerline and directed toward the landing runway. It normally follows the turn from base.

Standard left-hand airport traffic pattern showing departure, crosswind, downwind, base and final approach legs.
Important Terminology Where does the upwind leg fit?

U.S. traffic pattern terminology also identifies an upwind leg. It is a flight path parallel to the landing runway, in the direction of landing, generally offset from the runway. This is different from the departure leg, which follows the extended runway centerline after takeoff.

Remember Departure → Crosswind → Downwind → Base → Final. These describe the main sequence around the runway; the next section explains the direction of turns.
Pattern Direction

Left-Hand and Right-Hand Traffic Patterns

An airport traffic pattern may use either left-hand turns or right-hand turns. The direction determines which side of the runway the airplane flies on while completing the pattern. It is important to identify the correct direction before operating near an airport.

L
Left-Hand Pattern Standard Direction

In a left-hand pattern, the airplane makes left turns between the main legs of the circuit.

During the downwind leg, the runway is normally visible on the pilot's left side.

← Left turns throughout the pattern
R
Right-Hand Pattern Published Right Traffic

In a right-hand pattern, the airplane makes right turns between the main legs of the circuit.

During the downwind leg, the runway is normally visible on the pilot's right side.

→ Right turns throughout the pattern

How Is the Pattern Direction Determined?

At a non-towered airport, left traffic is normally used unless right traffic is indicated for the runway. A right-hand pattern may be established because of terrain, nearby obstacles, noise-sensitive areas or other local conditions.

The traffic pattern direction may differ between runways at the same airport. Pilots should check current airport information rather than assuming that every runway uses the same pattern.

Aeronautical Charts

A right-hand pattern is commonly identified by the abbreviation RP, followed by the applicable runway number. Always check the current Chart Supplement for details.

Airport Indicators and ATC

A segmented circle, when installed, may indicate the required traffic direction. At a towered airport, follow the traffic pattern instructions issued by ATC.

Example What does "RP 18" mean?

On an aeronautical chart, RP 18 indicates right traffic for Runway 18. Pilots using that runway should expect a right-hand pattern unless otherwise instructed or authorized.

Remember Left traffic is the standard pattern unless right traffic is indicated. Check the published information for the runway you intend to use.
Altitude & Positioning

Traffic Pattern Altitude and Spacing

Flying a traffic pattern requires both vertical and horizontal positioning. Traffic Pattern Altitude (TPA) provides a common operating height, while proper spacing helps pilots maintain a manageable flight path around the runway and adequate separation from other aircraft.

Traffic Pattern Altitude (TPA)

For most light, propeller-driven airplanes, the recommended traffic pattern altitude is 1,000 feet above ground level (AGL), unless a different altitude is published for the airport.

Traffic pattern altitude is normally referenced to the airport elevation. However, the aircraft altimeter displays altitude above mean sea level (MSL) when set correctly. This distinction is important when planning a circuit.

Typical Pattern Altitude 1,000 ft AGL Light Propeller-Driven Aircraft

This is the usual recommended altitude for a standard training pattern. It provides a common reference for aircraft operating around the airport.

Published Airport Information Check TPA Airport-Specific Altitudes

The airport may have an established pattern altitude different from 1,000 feet AGL. Always check the current Chart Supplement and applicable airport information before flight.

Practical Example How do you calculate the indicated traffic pattern altitude?

Suppose an airport has an elevation of 800 feet MSL and the traffic pattern is established at 1,000 feet AGL.

Airport Elevation 800 ft MSL
+
Height Above Airport 1,000 ft
=
Pattern Altitude 1,800 ft MSL

With the correct altimeter setting, the pilot would aim to maintain approximately 1,800 feet indicated while flying at the established traffic pattern altitude.

Traffic Pattern Spacing

The distance between the airplane and the runway affects the size of the traffic pattern. For a typical light training airplane, the downwind leg is often flown approximately ½ to 1 mile from the runway. This is a general reference, not a fixed distance for every airplane or airport.

Runway Distance Maintain a Useful Visual Reference

The runway should remain easy to identify and monitor. Flying unnecessarily far away can make the approach more difficult to judge.

Aircraft Performance Adjust the Pattern Size

Slower training airplanes generally use a smaller pattern than faster aircraft. Turn radius, approach speed and aircraft performance influence the appropriate spacing.

Wind & Traffic Maintain a Predictable Ground Track

Wind can push the airplane toward or away from the runway. Pilots must also monitor surrounding traffic and adjust their flight path when necessary.

Important Pattern altitude and spacing are not identical at every airport.

Published procedures, terrain, obstacles, weather conditions, aircraft performance and ATC instructions may require different altitudes or flight paths. Large and turbine-powered airplanes may also operate at higher pattern altitudes than light training aircraft.

When joining a traffic pattern, establish the appropriate altitude before entering the normal flow of traffic. Descending into an occupied pattern increases the risk of conflict with other aircraft.

Remember Traffic Pattern Altitude is usually 1,000 feet AGL for light propeller-driven airplanes unless otherwise published. Downwind spacing is commonly about ½ to 1 mile, but the correct pattern depends on the airport, aircraft, wind and surrounding traffic.
Arrival Preparation

Before Entering the Traffic Pattern

Before approaching an airport for landing, the pilot should develop a clear arrival plan. This includes reviewing airport information, obtaining current weather, preparing radio communications and identifying nearby traffic. Completing these tasks early reduces cockpit workload during the approach.

Airport Information Review the Destination Airport

Consult the current Chart Supplement, aeronautical charts and relevant NOTAMs before arrival.

  • Runways: Identify available runways, their lengths and any restrictions.
  • Local procedures: Check published traffic instructions, obstacles and noise-abatement procedures.
  • Airport status: Verify runway closures, airport conditions and tower operating hours when applicable.
Weather & Runway Obtain Current Airport Conditions

Listen to ATIS, AWOS or ASOS when available. Use the information to evaluate the expected landing conditions.

  • Wind: Check direction, speed and gusts.
  • Runway selection: Consider wind, available runways, traffic and published restrictions.
  • Altimeter: Obtain and set the appropriate current altimeter setting.
  • Weather: Evaluate visibility, ceiling and any changing conditions.
Communications Prepare the Correct Frequencies

Identify the communication frequencies associated with the airport before entering the terminal area.

  • Non-towered airport: Identify the published CTAF and listen for traffic reports.
  • Towered airport: Obtain ATIS when available and prepare to contact the appropriate ATC facility.
  • Initial report: Be ready to state your position, altitude and intentions clearly and concisely.

At a non-towered airport, pilots should begin monitoring and communicating on CTAF at least 10 miles from the airport when practical.

Situational Awareness Build a Picture of Nearby Traffic

Look outside frequently and use radio reports to identify aircraft approaching, departing or already operating near the runway.

  • Listen: Note reported aircraft positions and intended movements.
  • Look: Scan the approach paths, pattern area and surrounding airspace.
  • Anticipate: Consider where another airplane may be by the time you arrive.

ADS-B traffic displays can provide additional information, but they do not replace visual scanning. Not all aircraft may be displayed.

Prepare the Airplane Before Arrival

The final part of arrival preparation concerns the airplane itself. Complete the appropriate checklist and review the landing plan before cockpit workload increases.

Checklist Complete Arrival Checks

Perform the applicable descent or approach checks using the aircraft checklist. Confirm that required systems are configured appropriately for this phase of flight.

Performance Review Landing Speeds

Know the expected approach speeds and landing configuration. Use the approved AFM/POH for aircraft-specific procedures and limitations.

Alternatives Prepare for a Change of Plan

Consider what you will do if traffic, weather or runway conditions make the intended arrival unsuitable.

Arrival Briefing Five Questions to Answer Before Joining

Before entering the traffic pattern, the pilot should be able to answer these five questions without searching for basic information.

1

Which runway is appropriate for landing?

2

What local procedures apply to that runway?

3

Which frequency should I be using?

4

Where is the traffic that may affect my arrival?

5

What is my alternative if the approach cannot be completed safely?

Safety Do not assume the traffic pattern is clear because the radio is quiet.

Some aircraft may not be transmitting or may be difficult to see. Continue looking outside and listening carefully. If traffic activity or airport conditions are unclear, remain clear of the traffic flow while reassessing the arrival plan.

Remember Prepare the airport information, weather, runway, radio and airplane before arrival. The less time you spend searching for information near the airport, the more attention you can give to flying and avoiding other traffic.

Entering a Non-Towered Traffic Pattern — Step by Step

The recommended entry into a non-towered airport traffic pattern is a 45-degree approach to the downwind leg, joining near a point abeam the midpoint of the landing runway. This provides a predictable way to merge with airplanes already flying in the pattern.

Standard Entry Join the downwind at approximately 45°

Approach the downwind leg from outside the established traffic flow. Be in level flight at the appropriate pattern altitude before entering. The entry should provide enough distance to observe the pattern, identify other airplanes and merge without disrupting their flight paths.

RUNWAY 45° ENTRY DOWNWIND CROSSWIND BASE Left-hand pattern — not to scale
1 Remain Clear of Traffic
2 Establish Pattern Altitude
3 Approach at 45°
4 Scan and Yield
5 Join the Downwind
6 Establish Proper Spacing
1 Remain Clear of the Traffic Flow

Approach the airport from a position that allows you to observe the traffic pattern without immediately entering it. Identify airplanes already established on downwind, base or final.

Do not turn into the pattern if another airplane's position or intentions create a conflict.

2 Establish Pattern Altitude

Reach the appropriate traffic pattern altitude while remaining outside the traffic flow. Complete any necessary descent before beginning the entry.

Enter in level flight. Descending directly into an occupied pattern may place the airplane above traffic that is difficult to see.

3 Approach the Downwind at 45°

Establish a ground track approximately 45 degrees to the downwind leg, directed toward a point abeam the runway midpoint.

Allow sufficient distance to observe the airport and surrounding aircraft. Adjust for wind so the actual ground track follows the intended entry path.

4 Scan for Traffic and Yield

Continue scanning both the entry path and the downwind leg. Look for airplanes approaching from behind, ahead or from other directions.

Give way to aircraft already established in the pattern. If the available spacing is insufficient, remain clear and reposition for another entry.

5 Turn Onto the Downwind Leg

As the airplane reaches the downwind, make a smooth turn to align with the established traffic direction.

Avoid cutting in front of another airplane or making an abrupt turn that reduces spacing. Maintain coordinated flight and appropriate pattern airspeed.

6 Establish Safe Spacing

Once established on downwind, verify your position relative to the runway and surrounding aircraft.

Maintain the appropriate altitude and speed while preparing for the next phase of the pattern. Continue scanning and make the appropriate position reports on the published frequency.

Entering From the Opposite Side of the Airport

Reposition Before Joining the Pattern

When approaching from the side opposite the normal downwind entry, the pilot may need to cross over the airport and reposition before joining.

One recommended technique is to overfly the airport at least 500 feet above traffic pattern altitude, then continue clear of the traffic flow, approximately 2 miles beyond the pattern, before descending to pattern altitude and returning for a 45-degree downwind entry.

RUNWAY DOWNWIND CROSSWIND BASE FINAL 1 2 3 4 OVERFLY AT LEAST 500 FT ABOVE TPA CLEAR OF PATTERN ≈ 2 MI RETURN FOR 45° ENTRY Opposite-side arrival — not to scale
Overfly Above the Pattern → Move Clear and Descend → Return for the 45° Entry

This technique requires sufficient visibility, cloud clearance and awareness of nearby traffic. Do not descend through an occupied traffic pattern.

A midfield crossing at pattern altitude is another possible entry method, but it requires particular caution and should be avoided when the pattern is congested. Aircraft already on downwind or using the preferred 45-degree entry must be given way.

Safety Never force an entry into an occupied pattern.

If you cannot identify a safe opening, remain outside the normal traffic flow and reassess your position. Announcing an intention on the radio does not establish priority over another airplane. Maintain visual separation and comply with the applicable right-of-way rules.

Remember Enter at pattern altitude, approach the downwind at approximately 45 degrees, and join near midfield without disrupting established traffic. If the entry is not safe, remain clear and try again.
Flying the Pattern

Departure and Crosswind Legs — Step by Step

After takeoff, an airplane remaining in the traffic pattern continues along the departure path before turning onto the crosswind leg. The pilot must maintain a safe climb, choose the correct turning point and avoid conflicts with other aircraft operating near the airport.

Key Objective Do not rush the first turn after takeoff.

The crosswind turn must be made beyond the departure end of the runway and within 300 feet below the established traffic pattern altitude. Until both conditions are satisfied, continue the departure climb while monitoring surrounding traffic.

Departure Leg — Step by Step

1 Maintain the Departure Ground Track

After liftoff, continue climbing along the extended runway centerline. Use outside references to maintain the correct ground track.

If the wind is pushing the airplane sideways, apply the necessary wind correction while maintaining coordinated flight.

2 Identify the Crosswind Turning Point

Continue straight ahead until the airplane is beyond the departure end of the runway.

When remaining in the pattern, begin the crosswind turn only when the airplane is also within 300 feet below traffic pattern altitude. Continue climbing until the turning conditions are met.

3 Check for Traffic Before Turning

Before beginning the turn, scan the intended flight path and look for other airplanes on crosswind, downwind or entering the pattern.

Confirm that the turn will not create a conflict with nearby aircraft. Delay the turn when necessary to maintain separation.

Departure leg of an airport traffic pattern, showing the initial flight path after takeoff.
Altitude Reference When should the crosswind turn begin?

Suppose the established traffic pattern altitude is 1,000 feet AGL. The recommended turning range begins at approximately 700 feet AGL, provided the airplane is already beyond the departure end of the runway.

Example Pattern Altitude 1,000 ft AGL
Within 300 ft Below TPA 700–1,000 ft AGL

The altitude reference does not replace the runway-end requirement. Both conditions must be satisfied before the turn.

Crosswind Leg — Step by Step

4 Make the Crosswind Turn

Turn toward the appropriate side of the traffic pattern: left for a left-hand pattern or right for a right-hand pattern.

Use a smooth, coordinated turn with an appropriate bank angle. Continue maintaining the correct climb airspeed and avoid excessive bank at low altitude.

5 Maintain the Crosswind Ground Track

After completing the turn, establish a ground track approximately perpendicular to the extended runway centerline.

Account for wind drift rather than holding a heading that allows the airplane to drift off the intended path. Continue monitoring airspeed, altitude and surrounding traffic.

6 Reach Traffic Pattern Altitude

Continue climbing on the crosswind leg until reaching the established traffic pattern altitude.

Prepare to level off and make the next turn onto downwind. The turn to downwind should be made at pattern altitude, with sufficient spacing from the runway and other aircraft.

Crosswind leg of an airport traffic pattern, showing the turn away from the departure path toward downwind.
Transition to Downwind Plan the next turn before reaching downwind.

As the airplane approaches the intended downwind position, look toward the next flight path, check for other traffic and confirm that pattern altitude has been reached. Avoid turning so early that the downwind becomes unnecessarily close to the runway.

Safety Do not turn crosswind too early or become distracted during the climb.

Turning before the departure end of the runway, turning significantly below the recommended altitude, or using excessive bank can increase risk during a phase of flight with limited altitude. Maintain the recommended climb speed, monitor engine performance and remain alert for nearby traffic.

Remember Climb along the extended runway centerline, begin the crosswind turn beyond the departure end and within 300 feet below TPA, then continue climbing to pattern altitude before turning downwind.
Flying the Pattern

Downwind, Base and Final — Step by Step

Once established on downwind, the pilot prepares the airplane for landing while maintaining traffic pattern altitude. The descent begins on the base leg in the procedure described here, followed by the turn onto final and a stabilized approach to the runway.

Key Objective Build a stable approach one step at a time.

Maintain pattern altitude on downwind, reduce airspeed progressively, and configure the airplane as appropriate. Begin a controlled descent on base, then adjust the flight path to reach the intended aiming point on final. Use the aircraft's approved AFM/POH and checklist rather than applying fixed power, speed or flap settings to every airplane.

Downwind Maintain pattern altitude, complete landing checks, reduce speed and prepare the initial configuration
Base Begin controlled descent, correct for wind and configure further as required
Final Align with the runway, establish landing configuration and maintain a stabilized approach

Downwind Leg — Step by Step

1 Maintain Downwind and Monitor Traffic

Establish the downwind ground track parallel to the runway and maintain the appropriate traffic pattern altitude. Correct for wind drift and keep the runway in sight.

Identify preceding aircraft and maintain enough spacing to avoid overtaking or cutting in front of them during the approach.

2 Complete the Before-Landing Checks

Complete the aircraft's before-landing checklist while established on downwind. Check the fuel system, engine indications, mixture and carburetor heat if applicable, as required by the aircraft procedure.

Confirm the required landing gear position and indication if the aircraft has retractable gear. Check the remaining required items, including the landing configuration and occupant restraints.

3 Reduce Power and Airspeed

Reduce power as appropriate while maintaining traffic pattern altitude and allowing the airspeed to decrease toward the recommended initial approach speed.

Monitor the airspeed indicator. Before extending flaps, verify that airspeed is within the permitted range for the selected flap setting. Never exceed the applicable VFE limitation.

4 Select the Initial Flap Setting

At the appropriate point on downwind, select the initial flap setting recommended for the airplane, once the airspeed permits.

Flap extension changes lift, drag and pitching forces. Adjust pitch and power as necessary to maintain the desired altitude and speed, then retrim the airplane after it stabilizes.

5 Plan the Base Turn

Continue downwind in level flight at the established traffic pattern altitude. Select an aiming point on the runway and monitor the position of the approach end.

When the approach end is approximately 45° behind the airplane, consider the turn toward base. Adjust the turning point for wind, aircraft performance and traffic. Prepare to begin the descent after establishing the base leg.

Downwind leg showing the airplane flying parallel to the runway before turning toward base.
Visual Reference The 45-degree base-turn reference

Imagine a line from the airplane toward the approach end of the runway. When that point is approximately 45 degrees behind the airplane, it provides a useful reference for planning the turn onto base.

This is not the 45-degree entry described earlier in the lesson. It is a separate visual reference used when leaving downwind. The actual turning point depends on wind, traffic and the airplane's descent performance.

Aircraft Configuration How Flaps May Be Extended Throughout the Pattern
Downwind Initial Flaps

Some training airplanes use an initial setting such as 10° after reducing below the applicable flap speed limit. Maintain pattern altitude.

Base Additional Flaps

A further increment, such as 20° total, may be selected to increase drag and help establish the descent.

Final Landing Flaps

The recommended landing setting, such as 30° in some airplanes, may be selected once final approach is established.

These values are examples only. Some airplanes use different increments, additional flap settings or no flaps at all. Use the AFM/POH, observe the speed limitation for each setting, and consider any crosswind or abnormal-procedure restrictions.

Base Leg — Step by Step

6 Turn Onto Base and Check Traffic

Before turning, look toward base and final to check for other aircraft, including airplanes approaching directly toward the runway.

Make a smooth, coordinated turn. Maintain safe airspeed and avoid excessive bank at low altitude. Once established on base, correct for wind to maintain the intended ground track.

7 Begin the Descent and Control Airspeed

Once established on base, reduce power as appropriate and begin a controlled descent toward the runway. Adjust pitch and power together to maintain the desired airspeed and descent path.

Monitor altitude, airspeed and vertical speed. A descent rate near 500 feet per minute may be suitable in some training situations, but it is not a fixed target. The required rate depends on groundspeed, wind, altitude and the intended approach path.

8 Configure and Prepare for Final

Extend the next permitted flap increment if required by the landing procedure. Verify the applicable VFE, maintain the recommended base-leg airspeed and retrim as necessary.

Locate the extended runway centerline and plan the final turn early enough to avoid overshooting. Look for traffic on final before turning.

Base leg showing the descent toward the extended runway centerline before final approach.
Flight Technique Pitch, Power and Trim During the Descent

In a typical stabilized approach, pitch adjustments help control airspeed, while power adjustments help control the descent path. These controls interact: changing one can affect the other. Monitor the resulting airspeed and flight path instead of relying on a single control movement.

Too Fast?

Check the pitch attitude and power. Make small, coordinated corrections while maintaining the intended path.

Too Slow?

Reduce excessive nose-up attitude as appropriate and add power when necessary to prevent further airspeed decay or sink.

Too High?

Reassess the descent path and configuration. Avoid diving toward the runway and allowing airspeed to increase excessively.

Too Low?

Apply power as required to correct the descent. Do not stretch the glide by raising the nose and allowing airspeed to decay.

After each significant power or configuration change, retrim the airplane to reduce control pressure. If a safe approach cannot be recovered, go around.

Final Approach — Step by Step

9 Turn and Align With the Runway

Make a smooth, coordinated turn from base to final, aiming to roll out on the extended runway centerline. Plan to complete the turn with enough distance remaining to stabilize the approach.

Correct for crosswind drift to maintain the intended ground track. If the airplane overshoots the centerline, do not use excessive rudder or bank to force alignment.

10 Establish Landing Configuration

Select the final flap setting recommended for the runway, wind and aircraft conditions, once the applicable speed limitation is satisfied.

Confirm the landing gear, flap indication and remaining before-landing checklist items. Adjust power and pitch for the recommended final approach speed, then retrim.

11 Maintain the Glidepath and Aiming Point

Choose an appropriate aiming point on the runway and maintain a stable descent toward it. Watch whether the point moves up or down in the windshield.

If the aiming point moves upward, the airplane is tending to undershoot it. If it moves downward, the airplane is tending to overshoot it. Make small corrections early.

12 Evaluate the Stabilized Approach

Check airspeed, runway alignment, descent path, power and aircraft configuration. The airplane should be established on a predictable approach with only small corrections needed.

If the approach remains too fast, too slow, too high, too low or improperly aligned, initiate a go-around rather than attempting to salvage an unstable approach.

Final approach showing alignment with the runway centerline during descent toward landing.
Runway Reference
Use the runway picture together with airspeed

The runway's appearance relative to the glareshield changes as the airplane's pitch attitude changes. Compare the normal on-speed approach picture with the higher- and lower-airspeed examples.

The visual picture varies between airplanes and configurations. Always confirm airspeed on the indicator and use runway alignment and descent references to evaluate the approach.

Comparison of runway views at correct, high and low approach airspeeds.
Hover to enlarge
Final Approach Check Three Elements of a Stabilized Approach
Airspeed Correct and Controlled

Maintain the recommended final approach speed, including any adjustment specified for gusty conditions.

Flight Path Stable Descent

Maintain runway alignment and a controlled descent toward the selected aiming point.

Configuration Ready for Landing

Confirm landing gear, flaps, trim and checklist items are appropriate for the landing.

Safety Never skid a base-to-final turn to correct an overshoot.

Excessive inside rudder during a base-to-final turn can produce an uncoordinated flight condition and increase the risk of a stall-spin accident. Maintain safe airspeed and coordinated flight. If a safe final approach cannot be established, go around.

Remember Downwind: maintain traffic pattern altitude, complete the landing checks, reduce speed and observe VFE. Base: begin the controlled descent, manage airspeed and extend flaps as appropriate. Final: align with the runway, establish the landing configuration, maintain a stable aiming point and go around if the approach is not safe.
Pilot Communications

Radio Communications at Non-Towered Airports

At an airport without an operating control tower, pilots use the published Common Traffic Advisory Frequency (CTAF) to exchange information about their positions and intentions. These self-announced transmissions help other pilots understand how aircraft are moving around the airport.

Key Principle Tell other pilots where you are and what you intend to do.

A good radio call is short, clear and specific. Identify the airport, your aircraft, your position and your intended action. Use the runway number and the correct pattern direction. A radio announcement is not a clearance or a substitute for visual traffic separation.

How to Structure a Traffic Advisory Call

Message Structure Five parts of a clear radio call
1
Airport name Identify which airport the transmission concerns.
2
Aircraft identification State your aircraft type or call sign as appropriate.
3
Position and altitude Give your location and altitude when relevant.
4
Intentions and runway Explain the next action, including the runway and traffic direction.
5
Airport name again End the message by repeating the airport name.
Example Transmission
Riverton traffic, Cessna One Two Three Alpha Bravo, ten miles southwest, two thousand five hundred feet, inbound for left traffic Runway Two Seven, Riverton.

Riverton is a fictional airport used for the examples below. The positions and runway numbers are illustrative.

Arrival Radio Calls

For an arriving airplane, the recommended transmissions begin approximately 10 miles from the airport. Additional calls identify the aircraft as it enters the pattern, turns onto base and final, and leaves the runway.

Example: Landing on Runway 27

A Cessna is arriving to fly a left-hand pattern and make a full-stop landing on Runway 27. The pilot announces each important change of position on CTAF.

1 Approximately 10 Miles Out

Announce your location, altitude and intended arrival.

Riverton traffic, Cessna One Two Three Alpha Bravo, ten miles southwest, two thousand five hundred feet, inbound for left traffic Runway Two Seven, Riverton.

Include a recognizable direction and distance so other pilots can locate your airplane.

2 Entering Downwind

Report your position when joining the downwind leg.

Riverton traffic, Cessna One Two Three Alpha Bravo, entering left downwind Runway Two Seven, Riverton.

Stating left or right downwind helps other pilots identify the side of the airport on which you are flying.

3 Turning Base

Announce the turn from downwind onto the base leg.

Riverton traffic, Cessna One Two Three Alpha Bravo, turning left base Runway Two Seven, Riverton.

The call helps arriving aircraft anticipate your movement toward the final approach path.

4 Established on Final

Announce the runway and type of landing intended.

Riverton traffic, Cessna One Two Three Alpha Bravo, final Runway Two Seven, full stop, Riverton.

Use "full stop" when landing and exiting the runway. For repeated pattern practice, "touch-and-go" may be appropriate.

5 Clear of the Runway

Make this call only after completely vacating the runway and passing the runway holding position markings.

Riverton traffic, Cessna One Two Three Alpha Bravo, clear of Runway Two Seven, Riverton.

Do not announce that the runway is clear while part of the aircraft remains within the runway protected area.

Departure Radio Calls

Departing pilots should announce their intentions before taxiing and before entering the runway for departure. Additional position reports are useful when remaining in the traffic pattern or when changing a previously announced departure plan.

1 Before Taxiing

State your starting location and intended departure runway.

Riverton traffic, Cessna One Two Three Alpha Bravo, taxiing from the ramp for departure Runway Two Seven, Riverton.

Add the intended taxi route when useful to help other aircraft understand your movements.

2 Before Entering the Runway

Announce your intention before moving onto the runway.

Riverton traffic, Cessna One Two Three Alpha Bravo, entering Runway Two Seven for departure, remaining in left traffic, Riverton.

Look for arriving and departing traffic before entering. The transmission does not give you permission or priority.

3 Turning Crosswind

An additional call may be useful during pattern practice.

Riverton traffic, Cessna One Two Three Alpha Bravo, turning left crosswind Runway Two Seven, Riverton.

Keep optional calls concise and avoid unnecessary frequency congestion.

4 Turning Downwind

Report your position as you rejoin downwind for another circuit.

Riverton traffic, Cessna One Two Three Alpha Bravo, turning left downwind Runway Two Seven, Riverton.

Continue monitoring CTAF and use the arrival pattern calls for base and final.

What if you are departing the airport area?

State your intended departure direction instead of saying you will remain in the pattern. For example: "Riverton traffic, Cessna One Two Three Alpha Bravo, departing Runway Two Seven, departing the pattern to the west, Riverton." Update other pilots if your intentions change.

Special Situations on CTAF

Go-Around Announce Your Change of Intentions

When going around, maintain aircraft control and make a concise radio announcement when workload permits.

Riverton traffic, Cessna One Two Three Alpha Bravo, going around Runway Two Seven, remaining in left traffic, Riverton.
Conflicting Traffic Clarify an Uncertain Position

If another pilot reports a position that may conflict with yours, exchange specific position information. A brief question is more useful than a general request for everyone to respond.

Riverton traffic, Cessna One Two Three Alpha Bravo, entering left downwind Runway Two Seven. Aircraft reporting base, say your position, Riverton.
Common Mistakes Radio Habits to Avoid
Avoid "Any traffic in the area, please advise."

This is not recognized self-announcement phraseology. Report your own position and intentions instead.

Avoid "Taking the active runway."

State the actual runway number, such as Runway Two Seven. Other pilots may be planning to use a different runway.

Avoid Long or unclear transmissions

Think about the message before pressing the microphone. Speak clearly and avoid unnecessary details.

Avoid Assuming silence means no traffic

Some aircraft may not have radios, and some transmissions may be missed. Continue scanning for traffic.

What if no one answers your calls?

Self-announced CTAF calls do not require a reply. Continue listening and looking for traffic. A UNICOM operator may provide airport advisories, but does not issue takeoff or landing clearances. A silent frequency does not establish that the runway or pattern is clear.

Remember Airport name → Aircraft identification → Position → Intentions and runway → Airport name. Announce important changes of position, keep calls concise, and never rely on radio communications alone for traffic separation.
Tower Operations

Traffic Patterns at Towered Airports

At an airport with an operating control tower, air traffic control manages aircraft movements to organize arrivals, departures and runway use. Pilots may be assigned a different pattern entry, asked to extend a leg or instructed to follow another airplane. ATC instructions take precedence over the normal pattern plan, provided they can be followed safely and legally.

Key Principle Follow tower instructions, not an assumed traffic pattern sequence.

Do not automatically turn base because the runway reaches a familiar visual reference if the controller has instructed you to extend downwind. Listen carefully, read back important instructions and advise ATC immediately if you cannot comply.

Tower Responsibility Organize Traffic and Runway Operations

The controller issues runway clearances, traffic information and instructions intended to sequence aircraft safely and efficiently. Pattern direction, entry point and the timing of turns may change as traffic conditions require.

Pilot Responsibility Fly Safely and Comply With Instructions

Maintain aircraft control, monitor airspeed and altitude, look for traffic, and follow ATC instructions. A landing clearance does not remove the responsibility to avoid collisions or execute a go-around when necessary.

Contacting the Tower Before Entering the Pattern

When arriving at an airport with an operating control tower, establish radio communications early enough to receive instructions before entering the applicable controlled airspace. The AIM recommends an initial tower call at approximately 15 miles, unless local procedures or ATC instructions indicate otherwise.

1 Obtain Airport Information

Listen to ATIS when available and note the current information code. Confirm the tower frequency and any published arrival procedures.

2 Establish Two-Way Communication

Contact the appropriate facility, identify your aircraft and provide your position, altitude, ATIS code and request. Wait for a response using your aircraft identification.

3 Follow the Assigned Entry

The tower may instruct you to enter downwind, join base or make a straight-in approach. Follow the assigned routing rather than assuming that a 45-degree downwind entry is required.

Important Distinction Radio Contact Is Not the Same as Landing Clearance

For a typical Class D airport, two-way communication must be established before entering the airspace. If the tower responds using your call sign, even with "stand by," communications have been established. This does not allow entry if ATC specifically instructs you to remain outside.

Other airspace classes may have additional entry requirements. Regardless of the airspace, a separate clearance is required before landing at an airport with an operating control tower.

Understanding Common Tower Instructions

Controllers use concise instructions to adjust aircraft positions and spacing. The following examples illustrate common directions you may hear while approaching or flying a pattern.

Pattern Entry Enter Left Downwind
"Enter left downwind Runway Two Seven."

Join the left downwind for the assigned runway. Do not assume that the instruction also clears you to land.

Alternative Entry Make Right Base
"Make right base Runway Two Seven."

Approach the runway from the assigned right base leg instead of entering through the normal downwind route.

Spacing Extend Downwind
"Extend downwind. I'll call your base."

Continue along downwind until the controller provides further instructions. Do not make the base turn at your usual reference point.

Traffic Sequence Follow Other Traffic
"Follow the Cessna on final. Number two."

Identify the reported aircraft and maintain appropriate spacing. Advise the controller if you cannot see the traffic. Being number two is not a landing clearance.

Position Report Report Midfield Downwind
"Report midfield downwind."

Continue the assigned pattern and report when abeam approximately the runway midpoint. This helps the controller manage the arrival sequence.

Direct Arrival Make Straight-In Approach
"Make straight-in Runway Two Seven."

Proceed toward the extended runway centerline and establish a suitable final approach. Continue listening for the landing clearance.

Example: Arriving at a Towered Airport

The following exchange demonstrates how the controller can modify a normal traffic pattern to create spacing. Riverton is a fictional airport, as in the preceding radio examples.

Arrival Example — Runway 27 From Initial Contact to Landing Clearance

A Cessna approaches from the southwest and requests landing instructions. The tower assigns left downwind but later extends it to accommodate other traffic.

Pilot

"Riverton Tower, Cessna One Two Three Alpha Bravo, fifteen miles southwest, two thousand five hundred feet, information Bravo, inbound for landing."

Tower

"Cessna One Two Three Alpha Bravo, enter left downwind Runway Two Seven, report midfield."

Pilot

"Enter left downwind Runway Two Seven, report midfield, Three Alpha Bravo."

Tower

"Cessna Three Alpha Bravo, extend downwind. I'll call your base."

Pilot

"Extending downwind, Three Alpha Bravo."

Tower

"Cessna Three Alpha Bravo, turn base now, Runway Two Seven, cleared to land."

Pilot

"Turning base, Runway Two Seven cleared to land, Three Alpha Bravo."

Notice: The airplane does not turn base at the usual visual reference because the controller has instructed the pilot to extend downwind. The landing clearance is issued separately. This example illustrates the sequence of instructions; actual transmissions depend on traffic.

Departure and Runway Clearances

Ground operations at a towered airport require particular attention to the difference between taxi instructions, permission to enter a runway, and authorization to take off. These instructions are not interchangeable.

Ground Control Taxi Instructions

Contact ground control when appropriate and obtain a taxi route to the departure runway. Identify any hold-short instructions and read them back.

"Runway Two Seven, taxi via Alpha, hold short Runway Two Seven."

This instruction does not authorize you to enter the runway.

Before Runway Entry Hold Short or Line Up and Wait

Do not cross the runway holding position markings without appropriate ATC authorization. A runway crossing requires an explicit clearance.

"Runway Two Seven, line up and wait."

This permits entering and aligning on the specified runway, but not beginning takeoff.

Takeoff Cleared for Takeoff

Begin the takeoff only after receiving an explicit clearance for the correct runway. Read back the runway and takeoff clearance.

"Runway Two Seven, cleared for takeoff."

Continue to follow any assigned heading, turn or traffic pattern instruction.

Remaining in the Pattern Closed Traffic

If practicing repeated circuits, advise the controller that you wish to remain in the traffic pattern. The tower may approve the request or modify the pattern.

"Riverton Tower, Cessna Three Alpha Bravo, ready Runway Two Seven, request closed traffic."

Wait for the controller's departure clearance and any pattern instructions.

Runway Safety Never confuse an instruction with a takeoff or landing clearance.

"Taxi to," "line up and wait," "enter downwind" and "follow traffic" have different meanings. None of these instructions, by itself, authorizes takeoff or landing. Confirm the runway and clarify any uncertainty before proceeding.

After Landing and When the Tower Is Closed

Exiting the Runway

After landing, reduce to a safe taxi speed and exit the runway as directed or at an appropriate taxiway. Continue beyond the applicable runway holding position markings.

Once clear, stop if necessary and await further taxi instructions. Change to ground control when instructed. Do not assume the landing clearance authorizes taxiing across another runway.

Part-Time Control Towers

Some control towers operate only during published hours. When the tower closes, the airport operates without tower control and the applicable airspace classification may change.

Verify the operating hours, published frequencies and current status before arrival. Use the appropriate non-towered procedures when the tower is not operating.

Special VFR When Weather Is Below Basic VFR Minimums

Under certain conditions, Special VFR may permit flight within qualifying controlled surface airspace when the usual VFR weather minimums are not met. It requires an explicit ATC clearance and compliance with the applicable visibility and cloud-clearance requirements. For airplanes, the general minimum is one statute mile of visibility while remaining clear of clouds. Night operations have additional pilot qualification and aircraft equipment requirements. Special VFR is not automatic and does not replace sound weather-related decision-making.

Safety If an ATC instruction cannot be followed safely, say so immediately.

Tell the controller "unable" when an assigned maneuver, runway or traffic instruction cannot be complied with safely. Request clarification whenever an instruction is not understood. Continue looking for traffic, maintain aircraft control and be prepared to go around if a safe landing is not possible.

Remember Establish the required radio contact before entering controlled airspace. Follow assigned traffic pattern instructions, read back important restrictions, and obtain explicit takeoff and landing clearances. If an instruction is unclear or unsafe, advise ATC immediately.
Pattern Departure & Flight Safety

Leaving the Traffic Pattern and Go-Around Procedures

Not every takeoff is followed by another circuit, and not every final approach ends with a landing. Pilots must know how to leave the traffic pattern without conflicting with other aircraft and how to safely discontinue an approach when landing is no longer appropriate.

Key Distinction A normal departure and a go-around have different immediate priorities.

When departing the airport area, follow an appropriate exit path that keeps the airplane clear of established traffic. During a go-around, the immediate priority is to restore and maintain safe flying speed, arrest the descent and establish a positive climb before making further changes to the flight path.

Leaving a Non-Towered Traffic Pattern

When departing a non-towered airport, the recommended options are to continue straight out along the extended runway centerline or to exit at approximately 45 degrees in the direction of the traffic pattern. Always account for published procedures, obstacles and surrounding aircraft.

↑ Option 1 — Straight-Out Departure

Continue climbing along the extended runway centerline, maintaining the intended departure ground track.

Proceed beyond the departure end of the runway and continue away from the airport, maintaining awareness of aircraft climbing after takeoff or arriving in the surrounding area.

When this is useful

A straight-out exit can be appropriate when the planned route continues in the runway departure direction and no local procedure requires another path.

↗ Option 2 — 45-Degree Departure

Continue along the departure path until the airplane is beyond the departure end of the runway and has reached traffic pattern altitude.

Then make an approximately 45-degree turn to the left for left-hand traffic or to the right for right-hand traffic, provided the intended path is clear of conflicting aircraft.

When this is useful

A 45-degree exit provides a predictable way to leave the airport area without making an abrupt turn back toward the runway or across the normal arrival path.

Departure Planning Consider the route beyond the airport.

Before departing, determine how your intended route relates to the runway, the traffic pattern and any nearby controlled airspace. If the planned heading would require crossing an established arrival or departure path, remain clear of the traffic flow and choose an appropriate transition.

Published departure instructions, noise-abatement procedures, terrain and obstacles may affect the appropriate route. At a towered airport, follow the assigned departure instructions and clearances rather than choosing an independent pattern exit.

When Should You Go Around?

A go-around, also called a balked landing, is the transition from an approach toward landing to a climb away from the runway. It may be initiated by the pilot whenever a safe landing is in doubt, or instructed by air traffic control.

Unstable Approach

Airspeed, descent path or runway alignment cannot be brought within acceptable limits in time for a safe landing.

Runway Obstruction or Traffic

Another airplane, vehicle, animal or unexpected obstruction makes the runway unsafe for landing.

Unexpected Wind Conditions

Strong gusts, wind shear or a loss of directional control make continuing the approach or landing unsafe.

Unsatisfactory Landing Attempt

A long float, excessive bounce or another condition develops in which continuing the landing would create unnecessary risk.

Decision-Making A go-around is a normal maneuver, not a failed landing.

Recognizing that an approach should be discontinued is an important pilot skill. Making the decision early generally provides more altitude, time and room to establish a safe climb. Waiting until an unsafe landing is unavoidable reduces those margins.

Executing a Go-Around — Step by Step

The precise sequence depends on the airplane and its approved procedures. The following steps describe the principles of a typical single-engine training airplane. Always follow the AFM/POH and the aircraft-specific go-around checklist.

1 Apply Go-Around Power

Smoothly and promptly apply the maximum allowable takeoff or go-around power specified for the airplane. Confirm the expected engine response.

If applicable, select the carburetor heat position required for maximum power. Maintain directional control and continue tracking the runway.

2 Control Pitch and Airspeed

Adjust the pitch attitude to arrest the descent and transition toward the appropriate climb attitude as airspeed permits.

Do not pull abruptly into a steep nose-up attitude. The airplane must maintain sufficient airspeed and controllability to climb safely. Anticipate changing control pressures as power increases.

3 Retract Flaps Progressively

After the descent has been arrested and sufficient flying speed is available, move the flaps toward the intermediate or takeoff position specified by the AFM/POH.

Avoid retracting full landing flaps all at once unless specifically required by the aircraft procedure. An abrupt loss of lift at low altitude can cause the airplane to settle.

4 Establish a Positive Climb

Establish the recommended go-around or climb airspeed and verify a positive rate of climb. Retrim the airplane as necessary to relieve excessive control pressure.

For retractable-gear airplanes, retract the landing gear when a positive climb is established and the airplane is no longer expected to contact the runway, in accordance with the AFM/POH.

5 Complete the Climb Configuration

Continue accelerating toward the appropriate climb speed. Retract the remaining flaps in the prescribed sequence, making any required pitch and trim adjustments.

Use the aircraft's recommended climb speed for the conditions, including obstacle-clearance requirements when applicable. Maintain awareness of engine performance and surrounding traffic.

6 Follow the Appropriate Flight Path

Continue along the departure path while establishing a safe climb. At a non-towered airport, remain straight ahead until beyond the departure end of the runway, while checking for conflicting traffic.

Once safely established in the climb, follow the appropriate traffic pattern procedure if remaining in the circuit. If ATC is operating, comply with its instructions.

First Power and Airplane Control
Then Safe Airspeed and Climb
Next Flaps, Gear and Trim
Finally Flight Path and Communication
Important Technique A go-around can require substantial control pressure.

During a landing approach, the airplane may be trimmed for low airspeed and reduced power. Applying go-around power can create significant pitch and yaw changes. The pilot must actively control the airplane while transitioning to the climb configuration.

At very low altitude, the airplane may briefly settle toward the runway even after power is applied. Maintain a safe attitude and adequate airspeed. Do not retract the landing gear prematurely or attempt to force an immediate climb by raising the nose excessively.

Traffic and ATC Considerations After a Go-Around

Non-Towered Airport Remain Clear of Other Aircraft

Continue along the departure path and look for aircraft taking off, on final or already climbing in the pattern.

When workload permits, announce the go-around and whether you intend to remain in the pattern or depart the airport area. Do not allow the radio call to interrupt aircraft control.

Towered Airport Follow Tower Instructions

A controller may instruct you to go around because of runway traffic, sequencing or other operational considerations.

Follow the assigned flight path and advise ATC if you cannot comply. If you initiate a go-around yourself, notify the tower as soon as practical and obtain instructions for the next approach.

Safety Avoid abrupt configuration changes and premature turns at low altitude.

A go-around combines high power, changing pitch forces, flap retraction and an initial climb close to the ground. Maintain aircraft control before attempting secondary tasks. Do not sacrifice airspeed to obtain an excessively steep climb.

If engine performance is insufficient to establish a safe climb, follow the aircraft's applicable abnormal or emergency procedure. A successful go-around depends on adequate aircraft performance and a timely decision.

Remember Leaving the pattern: continue straight out or use the appropriate 45-degree departure after reaching pattern altitude. Going around: apply power, control pitch and airspeed, retract flaps progressively, establish a positive climb, configure the airplane and follow the appropriate flight path. Aircraft control always comes first.
Pattern Awareness & Safety

Common Traffic Pattern Mistakes and How to Avoid Them

Most traffic pattern problems develop gradually. An airplane drifts away from its intended ground track, spacing becomes too small, or an approach requires increasingly large corrections. Recognizing these changes early allows the pilot to respond before they become serious hazards.

Key Principle Recognize a developing problem before it requires an aggressive correction.

A safe traffic pattern depends on predictable positioning, adequate separation and controlled airspeed. If the airplane is no longer where it should be, determine whether the situation can be corrected smoothly and safely. Do not force the next turn simply to stay on a planned sequence.

Position and Traffic Awareness

1 Pattern Direction
Using the Wrong Runway or Traffic Direction

A pilot assumes that every runway uses left-hand traffic or continues flying a previously expected runway after conditions change. The resulting flight path may conflict with established traffic.

Better Response

Confirm the runway and required traffic direction before joining or turning. If there is a discrepancy, remain clear of conflicting traffic and resolve it before proceeding.

2 Traffic Identification
Assuming a Reported Aircraft Is the One You See

A pilot sees one airplane, hears a position report and assumes the two correspond. Another aircraft may actually be closer or approaching from a different direction.

Better Response

Match reported positions with visual observations, direction of travel and relative movement. If an aircraft's position remains uncertain, avoid entering or turning into the potentially conflicting flight path.

3 Visual Scanning
Focusing Too Much on the Runway or Instruments

While adjusting power, reviewing a display or watching the runway, the pilot may stop checking nearby aircraft and approaching flight paths.

Better Response

Use brief instrument and checklist checks, then return attention outside the airplane. Scan the intended turn area before each maneuver. Electronic traffic information supports, but does not replace, visual scanning.

Pattern Geometry, Wind and Spacing

4 Ground Track
Allowing the Downwind Distance to Change

Wind drift can move the airplane progressively closer to or farther from the runway, even while the pilot maintains what appears to be the correct heading.

Better Response

Compare the runway's position with the intended downwind track. Correct drift early and smoothly. Avoid abrupt changes in pattern width that could interfere with other aircraft.

5 Timing
Misjudging the Base Turn in Strong Wind

A tailwind on downwind increases groundspeed and may carry the airplane farther beyond the runway than expected. Wind on base can then change how quickly the airplane approaches the final approach path.

Better Response

Judge the turn using ground position and groundspeed, not time alone. Anticipate the effect of wind and adjust the turning point while preserving safe spacing and a normal coordinated turn.

6 Aircraft Spacing
Closing Too Quickly on Slower Traffic

A faster airplane may gradually catch an aircraft ahead on downwind or final. The pilot may then feel pressured to shorten the pattern, turn early or make excessive airspeed adjustments.

Better Response

Monitor the distance and closure rate early. Maintain a safe speed and suitable separation. At a towered airport, advise ATC if spacing becomes insufficient. Go around if a safe landing sequence cannot be maintained.

Example 1 The Airplane Ahead Is Slower

You are established on downwind and notice that the airplane ahead is getting closer. It has not yet turned base. Your normal turning point is approaching.

What should you consider?

Do not turn in front of the preceding aircraft. Maintain appropriate spacing and avoid making an abrupt, tight pattern to recover your preferred position. If safe spacing cannot be established, discontinue the approach.

Example 2 Wind Is Pushing You Toward Final

On base, your ground track is carrying you toward the extended runway centerline faster than anticipated. It becomes clear that the final turn may overshoot.

What should you consider?

Avoid forcing the turn with excessive bank or inside rudder. Maintain coordinated flight and safe airspeed. If safe alignment cannot be established, go around. Be especially alert to parallel runway traffic.

Approach Control and Landing Decisions

7 Approach Stability
Trying to Rescue a High or Fast Approach

The airplane reaches final too high, too fast or without the intended landing configuration. The pilot then attempts large pitch, power or configuration changes close to the runway.

Better Response

Evaluate the approach early. If maintaining the required airspeed, descent path and runway alignment would require large or rushed corrections, initiate a go-around.

8 Turn Coordination
Using Excessive Bank or Rudder to Reach Final

A pilot who turns base too late may try to force alignment by steepening the bank or using inappropriate rudder. At low airspeed and altitude, an uncoordinated turn can be especially dangerous.

Better Response

Make coordinated turns and preserve adequate airspeed. Never skid a turn to reach the runway centerline. If the approach geometry cannot be recovered safely, go around rather than attempting a last-second correction.

9 Landing Separation
Overlooking Runway Occupancy or Wake Turbulence

The airplane ahead may still be occupying the runway, or a preceding aircraft may leave wake turbulence along the approach path. Adequate visual distance does not always mean adequate wake separation.

Better Response

Continue monitoring runway occupancy and preceding traffic. Account for wake turbulence, particularly behind larger aircraft. Do not continue to a landing if the runway or approach cannot be used safely.

Pilot Self-Check Three Questions to Ask Throughout the Pattern
Position Am I Where I Should Be?

Compare your ground track, altitude and runway position with the intended flight path. Notice deviations before they become difficult to correct.

Traffic Where Are the Other Aircraft?

Identify the aircraft ahead, possible conflicting traffic and the available spacing before beginning the next turn.

Energy Are Airspeed and Altitude Appropriate?

Monitor airspeed, power and altitude in relation to the current leg. Recognize when the next phase cannot be completed with normal corrections.

Safety Do not allow the desire to complete the circuit to override safe judgment.

A traffic pattern is a framework for organizing aircraft movement, not a path that must be completed at any cost. If the planned entry would create a conflict, remain clear and reposition. If the approach becomes unsafe, go around. Always give priority to aircraft control, collision avoidance and the applicable right-of-way rules.

Remember Position, traffic and energy: check all three throughout the traffic pattern. Correct small deviations early, anticipate wind and closure rates, and never force an unsafe turn or landing.
Knowledge Check

Traffic Pattern Review Questions

Check that you understand traffic pattern legs, pattern altitude, entry procedures, flight techniques, radio communications and go-around decisions. Try to answer each question before opening the answer.

10

These ten questions review the essential knowledge and procedures covered in the Airport Traffic Pattern Pre-Flight Lesson.

01 Pattern Legs

What are the five main legs of a traffic pattern, in order, when remaining in the circuit after takeoff?

Show Answer Hide Answer
Departure, Crosswind, Downwind, Base and Final.

The departure leg follows the extended runway centerline after takeoff. It leads into the crosswind, downwind, base and final legs. The upwind leg is a separate track parallel to the runway, not another name for the departure leg.

02 Pattern Direction

What is the standard traffic pattern direction, and what does "RP 18" indicate?

Show Answer Hide Answer
Standard patterns use left turns. RP 18 means right traffic for Runway 18.

Unless otherwise indicated, airplanes normally make left turns in the traffic pattern. Published right-traffic designations identify runways for which right turns are required. Tower instructions may assign a different routing.

03 Pattern Altitude

An airport is at 800 feet MSL and its traffic pattern altitude is 1,000 feet AGL. What indicated altitude should you expect?

Show Answer Hide Answer
1,800 feet MSL.

Add airport elevation to the pattern height: 800 + 1,000 = 1,800 feet MSL. With the correct altimeter setting, this is the indicated altitude corresponding to the published traffic pattern altitude in this example.

04 Pattern Entry

How should a pilot normally enter the downwind at a non-towered airport, and what can be done when approaching from the opposite side?

Show Answer Hide Answer
Join downwind at approximately 45° near midfield and at pattern altitude.

For an opposite-side arrival, one recommended method is to overfly at least 500 feet above traffic pattern altitude, continue approximately two miles clear of the pattern, descend outside the traffic flow and return for a 45-degree entry.

In either case, scan for traffic and give way to aircraft already established in the pattern.

05 Departure and Crosswind

When should the crosswind turn be made after takeoff, and how is this different from a 45-degree departure out of the pattern?

Show Answer Hide Answer
Crosswind: beyond the runway end and within 300 feet below TPA. Pattern exit: a 45° turn after reaching TPA.

When remaining in the circuit, the recommended crosswind turn is made beyond the departure end once the airplane is within 300 feet below pattern altitude. To leave by a 45-degree exit, continue beyond the runway and reach pattern altitude before turning toward the traffic-pattern side.

Published procedures, obstacles and ATC instructions may require a different departure path.

06 Downwind and Base

In the approach procedure taught in this lesson, what altitude is maintained on downwind, when is the base turn planned, and where does the descent begin?

Show Answer Hide Answer
Maintain TPA on downwind, plan base using the 45° runway reference, and begin descending on base.

In this procedure, the airplane remains level at traffic pattern altitude throughout downwind. The approach end of the runway approximately 45° behind the airplane provides a useful reference for the base turn. After establishing base, begin a controlled descent.

Wind, spacing and the aircraft's approved procedure determine the exact turning point and descent profile.

07 Final Approach Safety

While turning from base to final, the airplane begins to overshoot the runway centerline. Why is excessive inside rudder dangerous, and what should the pilot do?

Show Answer Hide Answer
Excessive inside rudder can produce a dangerous skidding turn.

A skid during a low-speed base-to-final turn increases the risk of a stall-spin accident. Maintain coordinated flight and adequate airspeed. If safe runway alignment and a stabilized approach cannot be established, go around rather than forcing the turn.

08 Non-Towered Communications

What information should a pilot include in a CTAF position report, and does making a radio call establish priority?

Show Answer Hide Answer
Airport, aircraft, position, intentions and runway, then airport again. A call gives no priority.

A concise traffic advisory lets nearby pilots know where you are and what you intend to do. It does not provide an ATC clearance or replace the right-of-way rules and visual separation.

09 Tower Operations

At a towered Class D airport, what is required before entering the airspace, and does "enter left downwind" mean you are cleared to land?

Show Answer Hide Answer
Establish two-way radio communication before entry. No, entering downwind is not a landing clearance.

At a typical Class D airport, the tower must respond using your aircraft identification before you enter the airspace, unless another applicable authorization or procedure applies. Pattern instructions tell you where to fly. Landing requires an explicit landing clearance.

If ATC instructs you to extend downwind, do not turn base until authorized or otherwise instructed.

10 Go-Around

When should a pilot initiate a go-around, and what are the immediate priorities after deciding not to land?

Show Answer Hide Answer
Go around whenever a safe landing is in doubt. Control the airplane, apply power and establish a safe climb.

Reasons include an unstable approach, runway obstruction, unsafe traffic spacing or an unsatisfactory landing attempt. Follow the aircraft's go-around procedure: apply the prescribed power, control pitch and airspeed, retract flaps progressively, establish a positive climb, and complete the required gear and configuration changes.

Maintain a safe flight path and communicate when workload permits. Aircraft control always comes first.

Final Check A safe traffic pattern depends on three essential skills: knowing where the airplane should be, maintaining awareness of other traffic, and managing airspeed, altitude and configuration throughout the circuit. When the situation cannot be corrected safely, choose the appropriate alternative early.
error:
Study flight
Logo