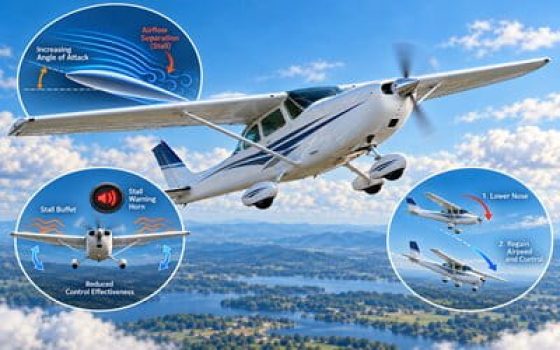
In this lesson, you will learn how to recognize the
indications of an impending stall,
understand how an aircraft enters a stall, recognize
the stall itself, and perform the correct
stall recovery procedure.
You will also study power-off, power-on and accelerated
stalls and the factors that affect stall behavior.
This lesson builds directly on the skills developed in
Slow Flight
.
Why Learn Stall Recognition and Recovery?
Recognize the stall early and recover correctly
Stall training teaches you to recognize when the airplane
is approaching its aerodynamic limit, prevent an
unintentional stall, and recover promptly if a stall occurs.
These skills are particularly important during low-speed
and maneuvering flight.
Recognition
Identify an impending stall
Learn to recognize changes in control feel,
aircraft attitude, stall warning, buffet and
other cues before the wing fully stalls.
Stall Awareness
Understand the critical angle of attack
An aircraft stalls when the wing exceeds its
critical angle of attack. Understanding this
principle is more important than memorizing
one particular airspeed.
Recovery
Restore normal airflow over the wing
Correct recovery begins by reducing the angle
of attack, then returning the airplane to
controlled flight while minimizing unnecessary
altitude loss.
Real-World Flying
Recognize situations where stalls can occur
Takeoff, approach, landing, go-around and
maneuvering flight can all place the airplane
closer to stall conditions if airspeed,
coordination or angle of attack are poorly managed.
Basic Idea
What Is an Aerodynamic Stall?
An aircraft stall occurs when a wing exceeds
its critical angle of attack.
Beyond this point, the airflow over the wing separates more
significantly, lift decreases and drag increases.
The airplane can no longer produce the same amount of lift
for that flight condition.
The Key Principle
A stall is an angle-of-attack event
Pilots often associate stalls with low airspeed because
many training stalls are practiced while slowing the
airplane. However, low airspeed itself does not
cause the stall.
The wing stalls when its critical angle of attack is
exceeded. This means an airplane can stall at different
airspeeds depending on weight, load factor, configuration
and maneuvering.
Angle of Attack
The critical value is exceeded
As the angle between the wing's chord line and the
relative airflow increases, the wing eventually
reaches its critical angle of attack.
Lift
Lift begins to decrease
Before the critical angle is reached, increasing
angle of attack generally increases lift.
Beyond the critical angle, airflow separation causes
lift to decrease.
Drag
Drag increases
As airflow separation increases, aerodynamic drag also
rises significantly, reducing the airplane's ability
to maintain its previous flight path.
Aviation Terminology
In this lesson, stall means an
aerodynamic wing stall.
It does not mean that the engine has stopped.
The engine can be producing power while the wing is stalled.
Remember
An airplane does not stall because it is simply flying
slowly. It stalls when the wing exceeds its critical
angle of attack.
Aerodynamics
Angle of Attack and Why a Wing Stalls
To understand a stall, you first need to understand
angle of attack.
This is the aerodynamic relationship that determines when
a wing reaches its stall.
Angle of Attack
What is angle of attack?
The angle of attack (AOA) is the angle
between the wing's chord line and the
relative wind.
The chord line is an imaginary straight line from the
leading edge to the trailing edge of the wing.
The relative wind is the airflow approaching the wing
from the opposite direction of its movement through the air.
Angle of attack is therefore not the same thing as
pitch attitude.
It describes how the wing meets the airflow.
Angle of attack is measured between the chord line
and the relative wind.
Changing the relationship between the wing and
airflow changes the angle of attack.
Increasing AOA
More angle of attack initially produces more lift
At normal angles of attack, airflow remains largely
attached to the wing.
Increasing angle of attack normally increases the wing's
lift coefficient.
This explains why a pilot gradually increases back pressure
as an airplane slows: the wing needs a higher angle of attack
to produce the lift required for flight.
Critical Angle
There is a limit to how much lift the wing can produce
As angle of attack continues to increase, the wing eventually
reaches its critical angle of attack.
At approximately this point, the wing reaches its maximum
lift coefficient.
Increasing the angle of attack beyond this aerodynamic limit
causes the wing to stall.
Airflow Separation
Why does the wing lose lift?
As angle of attack becomes large, the airflow over
the upper surface becomes increasingly difficult
to keep attached to the wing.
Separation begins over part of the wing and becomes
more extensive as the critical angle is approached.
Beyond the critical angle of attack,
airflow separation increases dramatically.
Lift decreases while drag rises significantly.
This is the aerodynamic stall.
Increasing airflow separation reduces the wing's
ability to produce lift.
Lift Curve
Lift rises, reaches a maximum, then decreases
The lift curve summarizes the whole process.
Lift increases as angle of attack increases until the wing
reaches its maximum lift coefficient.
After the critical angle is exceeded, lift decreases.
The peak of the curve corresponds approximately
to the critical angle of attack.
Important
A stall is defined by angle of attack,
not by one particular airspeed.
An airplane can therefore stall at different airspeeds
depending on its weight, load factor, configuration and
maneuvering condition.
Remember
Angle of attack is the angle between the wing's chord line
and the relative wind. Lift increases as angle of attack
increases only up to the critical angle; beyond it,
the wing stalls.
Stall Speed
Stall Speed Is Not a Fixed Number
Your aircraft may have published stall speeds in the
POH, but those speeds apply only to specific
conditions. Change the aircraft's weight, configuration or
load factor and the indicated airspeed at which the stall
occurs can also change.
Key Idea
The critical AOA stays the reference — the airspeed changes
In a given aircraft configuration, the wing still stalls
when it reaches its critical angle of attack.
However, the airspeed at which that angle is reached
can be different from one flight condition to another.
This is why relying only on a memorized stall speed can
give a pilot a false sense of security.
Factor 01
Weight
A heavier airplane must produce more lift.
Under otherwise comparable conditions,
greater weight increases stall speed.
Factor 02
Load Factor
Maneuvering can increase the load carried by the wing.
A higher load factor requires more lift and
raises the stall speed.
Factor 03
Flaps
Extending flaps changes the wing's aerodynamic
characteristics and generally allows the airplane
to stall at a lower airspeed
within the approved configuration.
Factor 04
Center of Gravity
Center-of-gravity position affects the forces the
airplane must balance and can therefore affect
stall speed and stall characteristics.
Always remain within the approved CG limits.
+41%
Level Turn Example
A 60° bank can produce a much higher stall speed
In a coordinated level turn at
60° of bank, the load factor is
approximately 2 G.
The resulting stall speed is about
41% higher than the airplane's
1 G stall speed.
Practical Meaning
Being above the published 1 G stall speed does
not guarantee that the airplane cannot stall.
An abrupt pull-up or a steep level turn can increase
load factor enough for the wing to reach its critical
angle of attack at a substantially higher airspeed.
Remember
Stall speed changes with the flight condition.
Do not think of the published stall speed as a universal
minimum speed below which a stall suddenly occurs.
Stall Recognition
How to Recognize an Impending Stall
A stall should not come as a surprise.
As the airplane approaches its critical angle of attack,
several visual, physical and audible cues
normally begin to appear.
Learning to recognize a combination of these cues is more
useful than relying on one instrument or one warning device.
What You May Notice
The airplane begins to feel different
As the wing approaches the stall, the airplane may
require increasing back pressure, the controls may
become less effective, and the airflow around the
aircraft may begin to buffet.
Depending on the aircraft, you may also hear or see a
stall-warning indication.
These cues should tell you that the airplane is
approaching its aerodynamic limit.
Learn to combine several stall cues rather than
depending on a single warning.
Recognition Cues
Airspeed
Airspeed is often low or decreasing during a normal
training stall, but do not use airspeed alone to decide
whether the wing is close to stalling.
Back Pressure
Increasing elevator back pressure may be required as
the airplane slows and angle of attack increases.
Excessive back pressure is an important warning cue.
Control Feel
The controls may feel softer or less responsive as
airflow over the control surfaces decreases.
Pilots often describe this as a
“mushy” control feel.
Buffet
Disturbed airflow may produce vibration or buffeting
as the wing approaches the stall.
The strength of this cue varies between aircraft.
Stall Warning
A stall-warning horn, light or other warning system
may activate before the stall.
Treat it as one cue among several, not as the only
indication of an approaching stall.
Flight Path
The airplane may begin losing altitude or fail to
maintain the desired flight path even though additional
back pressure is being applied.
Impending or Full Stall?
Impending Stall
The wing is approaching the critical AOA
Warning signs are developing, but the wing has not yet
progressed into a fully developed stall.
This is the ideal time to recognize the condition and
prevent it from progressing.
Full Stall
The critical AOA has been exceeded
The wing can no longer maintain its previous lift.
A noticeable break, nose drop, wing drop or increasing
descent may occur depending on the aircraft and flight
condition.
Important
Do not expect every stall to look or feel exactly the same.
Pitch attitude, power, configuration, coordination and
load factor can change the cues.
A stall can also occur without an obviously high
nose attitude.
Remember
Recognize the pattern, not just one warning:
increasing back pressure, reduced control effectiveness,
buffet, stall warning and changes in flight path can all
indicate that the wing is approaching a stall.
Before the Maneuver
HASEL and Clearing Before Stall Practice
Stall practice intentionally brings the wing close to, or beyond,
its critical angle of attack.
Before beginning the maneuver, make sure the airplane is at a
safe altitude, in a suitable area and clear of other traffic.
Use the same HASEL check introduced in the
Slow Flight lesson.
HHeight
Sufficient altitude for the maneuver and recovery.
AArea
Suitable terrain, airspace and practice area.
SSecurity
Belts, doors and loose items properly secured.
EEngine
Complete the appropriate aircraft and engine checks.
LLookout
Clear the surrounding area carefully for traffic.
Altitude
Allow room for recovery
Stall practice may involve altitude loss.
Begin high enough to complete the exercise and recover
safely in accordance with your instructor's procedure
and applicable operating guidance.
Lookout
Clear before reducing speed
Perform the appropriate clearing maneuver and maintain
an active visual scan.
Other traffic can be difficult to see while your
attention is divided during stall practice.
Coordination
Begin from coordinated flight
Establish the airplane in coordinated flight before
the stall entry.
Unwanted yaw near the stall can increase the risk of
a wing drop and possible spin development.
Before Entry
Complete the pre-maneuver checks first.
Only then begin the specific
power-off or power-on stall entry procedure.
The exact configuration and aircraft checks should follow
the POH/AFM, checklist and your instructor's procedure.
Remember
HASEL first. Clear the area, confirm sufficient altitude
and establish coordinated flight before beginning any
stall exercise.
Stall Entry
How to Enter a Stall
After completing the pre-maneuver checks, the airplane is
deliberately brought toward the stall in a controlled and
coordinated manner.
The exact setup depends on whether you are practicing a
power-off stall or a
power-on stall.
Common Entry
1
Establish coordinated flight
Begin from the appropriate heading, altitude and
aircraft configuration.
Keep the airplane coordinated before reducing
airspeed.
2
Set the required power
Reduce power for a power-off stall or establish
the appropriate power setting for a power-on stall.
Use the procedure specified for your aircraft and
training exercise.
3
Configure the airplane as required
Select the flap and landing-gear configuration
appropriate to the type of stall being practiced.
Observe all aircraft operating limitations.
4
Allow the airspeed to decrease
Use pitch as required while the airplane slows.
During a typical training entry, progressively
increase back pressure so that the angle of attack
continues to increase.
5
Maintain coordination as the stall approaches
Use rudder as required to control yaw.
Avoid abrupt or excessive aileron inputs as the
airplane approaches the stall.
6
Continue smoothly to the training objective
For a full-stall demonstration, continue increasing
angle of attack until the stall occurs.
For an impending-stall exercise, recover when the
required stall indications appear.
Power-Off or Power-On?
Power-Off Stall
Simulates an approach or landing situation
Power is reduced and the airplane is normally placed
in an approach or landing configuration appropriate
to the exercise.
As airspeed decreases, progressively increase pitch
and angle of attack until the required stall
indication or full stall occurs.
Power-On Stall
Simulates a takeoff or climb situation
The airplane is configured to represent a takeoff,
climb or go-around condition and power is maintained
at the setting specified for the exercise.
Because power is applied, the airplane may require
a noticeably higher pitch attitude before reaching
the critical angle of attack.
Power-on stall example. The exact pitch attitude and
power setting depend on the aircraft and the procedure
being practiced.
As the Stall Approaches
Pitch
Increase AOA smoothly
Avoid abrupt elevator inputs.
The goal is a controlled and recognizable progression
toward the stall.
Rudder
Keep the airplane coordinated
Use rudder to prevent unwanted yaw, especially during
a power-on stall where propeller effects are stronger.
Aileron
Avoid aggressive inputs
Large aileron deflections near the stall can increase
aerodynamic asymmetry between the wings.
Aircraft Specific
Power settings, flap configuration, carburetor heat,
target speeds and other details vary between airplanes.
Follow the POH/AFM, aircraft checklist and your
instructor's procedure.
Remember
Set the configuration • reduce airspeed • increase angle
of attack smoothly • stay coordinated • recognize the
stall indications.
Recovery
Stall Recovery Procedure
Once a stall occurs, the priority is to restore normal airflow
over the wing.
The fundamental recovery action is therefore to
reduce the angle of attack below the critical angle.
Power and configuration changes then help the airplane regain
airspeed and return safely to the desired flight path.
First Principle
Reduce angle of attack before trying to regain altitude
If the airplane is stalled, continuing to pull back in an
attempt to stop the descent keeps the wing at a high angle
of attack.
The first requirement is to
release enough back pressure and lower the nose as
necessary to break the stall.
Some altitude loss during this process is normal.
Recovery Sequence
1
Reduce the angle of attack
Release elevator back pressure and lower the nose
enough to bring the wing below its critical angle
of attack.
This is the essential stall-recovery action.
2
Control yaw and level the wings
Keep the airplane coordinated and stop any unwanted
yaw.
As normal roll control becomes effective, smoothly
bring the wings toward level.
3
Add power as required
Apply appropriate power to help accelerate the
airplane and minimize altitude loss.
Use the power setting required by the aircraft
procedure rather than assuming that every stall
recovery requires exactly the same power input.
4
Adjust configuration as required
If flaps, landing gear or other configuration
changes are involved, manage them according to the
aircraft's POH/AFM and the procedure being practiced.
Avoid abrupt changes that could produce excessive
altitude loss.
5
Allow the airplane to accelerate
Maintain a safe attitude while the airplane regains
flying speed.
Do not immediately pull back aggressively after the
stall breaks.
6
Return smoothly to the desired flight path
Once the wing is flying normally and sufficient
airspeed has been regained, smoothly return to the
required attitude, altitude and flight path.
Priority 01
Break the stall
Priority 02
Restore controlled flight
Priority 03
Recover the flight path
Altitude Loss
Some altitude loss may be necessary to reduce the angle of
attack and regain airspeed.
Do not sacrifice stall recovery in an attempt to
maintain altitude.
First restore normal flight, then recover the desired
flight path.
Avoid a Secondary Stall
Do not pull up too aggressively after the first stall
If the pilot applies excessive back pressure immediately
after the stall breaks, the angle of attack can again
exceed its critical value.
The airplane can then enter a
secondary stall.
Recover smoothly and allow sufficient airspeed to build
before increasing the load on the wing.
Aircraft Specific
Use the procedure for the airplane you are flying
Exact power settings, flap handling, carburetor heat,
propeller controls and other actions vary between aircraft.
Follow the POH/AFM, aircraft checklist and your
instructor's procedure.
Remember
Reduce AOA • control yaw • level the wings • add power as
required • manage configuration • regain airspeed • recover
the flight path smoothly.
Accelerated Stall
Accelerated Stalls
An accelerated stall occurs when the wing
reaches its critical angle of attack while the airplane is
experiencing a load factor greater than 1 G.
Because of this increased loading, the stall can occur at an
airspeed significantly higher than the normal 1 G
stall speed.
Why It Happens
1
Load factor increases
A steep level turn, pull-up or abrupt change in
flight path can increase the load carried by the wing.
2
More lift is required
To support the increased load, the wing must produce
more lift, which generally requires a higher angle
of attack.
3
Critical AOA is reached sooner
The wing can therefore reach its critical angle of
attack while the airspeed is still well above the
normal 1 G stall speed.
Important
The airplane is not stalling because it is banking.
The important factor is the
increased load factor and resulting angle of
attack.
In a coordinated level turn, greater bank requires more
lift to maintain altitude, which increases load factor.
Where It Can Happen
Steep Level Turn
Increasing back pressure to maintain altitude in a
steep turn increases load factor and can bring the
wing to its critical angle of attack at a relatively
high airspeed.
Abrupt Pull-Up
A rapid or excessive pull on the elevator can increase
both angle of attack and load factor very quickly,
producing an accelerated stall.
Recovery or Dive Pull-Out
Pulling too aggressively during recovery from a dive,
stall or other maneuver can rapidly load the wing and
produce another stall.
Tightening a Turn
An unexpectedly tightening turn can combine increased
bank and back pressure.
This is especially important near the ground and will
be examined in the next section on turning and
cross-control stalls.
Recognition
Higher G
An accelerated stall may feel more abrupt
Before the stall, the pilot may feel increased
pressure into the seat as load factor rises.
The airplane may then stall at an airspeed that would
normally appear comfortably above its published
wings-level stall speed.
Accelerated stalls caused by abrupt maneuvering can
develop more aggressively than a normal 1 G stall and
may occur at a lower-than-expected pitch attitude.
Recovery
The same fundamental rule still applies
Regardless of the airspeed, the wing must be brought below
its critical angle of attack.
Respond promptly to the first stall indication and use the
stall recovery procedure already covered above.
Accelerated-stall practice requires careful aircraft-specific guidance
Maneuvering speed, aircraft weight, configuration and
structural limitations matter during accelerated-stall
training.
Do not practice this maneuver independently.
Follow the aircraft POH/AFM and the procedure specified
by a qualified flight instructor.
Remember
An accelerated stall can occur well above the normal
1 G stall speed. Increased load factor can bring the wing
to its critical angle of attack much sooner than expected.
Turning Stalls
Turning Stalls, Cross-Control and Base-to-Final Risk
An airplane can stall while turning just as it can in
wings-level flight.
The danger becomes much greater when the airplane is
uncoordinated, because yaw can make the stall
strongly asymmetric and may lead rapidly to a spin.
Coordination Matters
Coordinated Turn
Both wings tend to approach the stall more evenly
In a properly coordinated turn, the airplane generally
behaves more predictably as the critical angle of
attack is reached.
A stall may still occur, especially if load factor
and back pressure are high.
Uncoordinated Turn
Yaw can create a much more asymmetric stall
If the airplane is slipping or skidding as the stall
develops, the wings can experience different local
aerodynamic conditions.
A sudden wing drop and rapid roll may result.
Do Not Memorize the Wrong Rule
Do not rely on a rule such as
“the inside wing always stalls first”
or “the outside wing always stalls first.”
Stall behavior depends on angle of attack, yaw,
control inputs, aircraft design and the actual flight
condition.
The practical priority is to
remain coordinated and recognize the stall early.
Slip and Skid
Coordinated
Rudder and aileron inputs are balanced so the airplane
follows the turn without excessive sideways motion.
Slip
The airplane is banked more than required for the
rate of turn.
The airplane moves partly sideways toward the lower
wing and the inclinometer ball moves toward the
inside of the turn.
Skid
Too much rudder is being used for the amount of bank.
The tail moves outward and the airplane is forced
around the turn.
A skid close to the stall is particularly hazardous.
Base-to-Final Scenario
Why overshooting final can become dangerous
One of the classic cross-control stall situations occurs when
a pilot overshoots the runway centerline while turning from
base to final.
Instead of accepting the overshoot, the pilot may try to force
the airplane back toward the runway with excessive rudder while
also applying opposite aileron and increasing back pressure.
This creates a dangerous combination of
skid, increasing angle of attack and low altitude.
1
Overshoot
The airplane passes through the extended runway
centerline.
2
Excess Rudder
The pilot uses inside rudder to force the nose toward
the runway.
3
Opposite Aileron
Aileron may be applied to prevent the bank from
increasing further.
4
Back Pressure
The pilot pulls back to prevent the nose from dropping,
increasing angle of attack.
5
Stall / Spin Risk
If the critical AOA is exceeded, the uncoordinated
stall can rapidly develop into a spin.
Why It Is Dangerous
There may be very little altitude available for recovery
A base-to-final turn is made relatively close to the ground.
If an uncoordinated stall develops into a spin, there may
not be enough altitude for recovery before ground contact.
This is why prevention is much more important than trying
to recover from a developed stall-spin close to the ground.
Best Decision
If you overshoot final, do not force the airplane back onto the centerline.
Maintain coordinated flight.
If the approach cannot be safely stabilized,
go around and fly another approach.
A runway overshoot is not an emergency; an uncoordinated
stall close to the ground can be.
If a Stall Develops
Reduce angle of attack immediately
At the first indication of a stall, apply the
stall recovery procedure already covered:
reduce angle of attack, control yaw, restore coordinated
flight, level the wings as control becomes effective and
use power as required.
Remember
A turning stall is not dangerous simply because the
airplane is turning. The critical combination is high AOA
plus poor coordination. Never use excessive rudder to force
a base-to-final turn — go around instead.
Safety
Common Stall Errors and Safety
Most problems during stall training do not come from the stall
itself, but from poor preparation, loss of coordination or an
incorrect recovery response.
The goal is to remain
smooth, coordinated and aware of angle of attack
throughout the maneuver.
Priority 01
Recognize early
Notice the developing stall cues before the airplane
reaches an unexpected full stall.
Priority 02
Stay coordinated
Control unwanted yaw throughout the entry, stall and
recovery to reduce the risk of an asymmetric stall.
Priority 03
Reduce AOA first
Do not allow altitude, airspeed or wing-level concerns
to distract from the first aerodynamic requirement:
break the stall.
Common Errors
Common Error
Fixating on the airspeed indicator
The pilot watches one number instead of recognizing
the complete pattern of attitude, control feel,
buffet, warning and coordination.
Better Habit
Use all available cues
Include airspeed in the scan, but combine it with
outside references and the physical indications
from the airplane.
Common Error
Poor rudder coordination
Allowing significant yaw near the stall can make
the stall asymmetric and increase the possibility
of a rapid wing drop or spin entry.
Better Habit
Keep the airplane coordinated
Use appropriate rudder throughout the maneuver,
especially during high-power, low-airspeed
conditions.
Common Error
Trying to level the wings before breaking the stall
Focusing first on correcting bank can distract the
pilot from the critical aerodynamic problem:
excessive angle of attack.
Better Habit
Reduce AOA first
Bring the wing below its critical angle of attack,
then use effective roll control to return the wings
toward level.
Common Error
Using power instead of reducing AOA
Adding power while continuing to hold excessive
back pressure does not remove the aerodynamic cause
of the stall.
Better Habit
Break the stall, then use power
Reduce angle of attack immediately and add the
appropriate power as required to regain airspeed
and minimize altitude loss.
Common Error
Excessive nose-down input
An unnecessarily aggressive forward elevator input
can create excessive altitude loss, airspeed
buildup or very low load factor.
Better Habit
Use only the pitch change required
Reduce the angle of attack sufficiently to unstall
the wing, then manage the recovery smoothly.
Common Error
Pulling up too aggressively after recovery
Trying to regain altitude immediately can rapidly
increase angle of attack and load factor again.
Better Habit
Prevent a secondary stall
Allow the airplane to regain sufficient flying
speed, then return smoothly to the desired
flight path.
Common Error
Losing situational awareness
The pilot becomes so focused on the maneuver that
heading, altitude, traffic or the desired flight
path are forgotten after recovery.
Better Habit
Finish the maneuver completely
Once normal flight is restored, re-establish the
required heading, altitude, configuration and
traffic scan.
Safety Principle
Never sacrifice stall recovery just to avoid losing altitude
When the wing is stalled, the immediate priority is to
restore controlled flight.
Attempting to hold altitude with additional back pressure
can keep the wing stalled and make the situation worse.
During Training
Intentional stalls should be practiced with adequate
altitude, effective traffic clearing and the appropriate
aircraft-specific procedure.
Avoid abrupt control inputs and remain aware of aircraft
limitations throughout the exercise.
Remember
Recognize early • stay coordinated • reduce AOA first •
use power appropriately • recover smoothly • avoid a
secondary stall • return to the desired flight path.
Additional Training
Airplane Maneuvers Mastery — Private Pilot
Want to see stall recognition and recovery demonstrated in flight?
Pilot Institute's Airplane Maneuvers Mastery
course provides additional practical training on stalls,
stall recovery and other private pilot maneuvers.
Paid training course. Affiliate link — StudyFlight may earn
a commission from qualifying purchases at no additional cost to you.
Knowledge Check
Stall Review Questions
Check that you understand the key ideas behind stall recognition,
entry and recovery.
Try to answer each question
before opening the answer.
8
These eight questions cover angle of attack, stall speed,
recognition, HASEL, stall entry, recovery, accelerated
stalls and base-to-final risk.
01
Aerodynamics
What actually causes an aerodynamic stall?
Show Answer
Exceeding the critical angle of attack.
A wing stalls when its angle of attack exceeds
the critical value and airflow separation becomes
extensive enough for lift to decrease.
02
Stall Speed
Can an airplane stall above its published 1 G stall speed?
Show Answer
Yes.
Stall speed changes with factors such as load
factor, weight and configuration.
The aerodynamic stall still occurs when the wing
reaches its critical angle of attack.
03
Recognition
What cues can indicate that a stall is approaching?
Show Answer
Use several cues together.
Possible indications include increasing back
pressure, reduced control effectiveness,
aerodynamic buffet, stall warning and difficulty
maintaining the desired flight path.
04
HASEL
What does HASEL stand for before stall practice?
Show Answer
Height • Area • Security • Engine • Lookout
HASEL helps organize the essential safety checks
before intentionally approaching a stall.
05
Stall Entry
Why is coordination especially important as the stall approaches?
Show Answer
To avoid excessive yaw and an asymmetric stall.
Significant yaw near the critical angle of attack
can contribute to a wing drop and create the
conditions for a spin entry.
06
Recovery
What is the first aerodynamic action in any stall recovery?
Show Answer
Reduce the angle of attack.
Release enough back pressure and lower the nose
as necessary to bring the wing below its critical
angle of attack.
Power alone does not break an aerodynamic stall.
07
Accelerated Stall
Why can an accelerated stall occur at a relatively high airspeed?
Show Answer
Because increased load factor raises the stall speed.
During a steep level turn, abrupt pull-up or other
loaded maneuver, the wing must produce more lift.
It can therefore reach its critical angle of attack
at an airspeed well above the normal 1 G stall speed.
08
Base to Final
What should you do if you overshoot the runway centerline on base-to-final?
Show Answer
Do not force the airplane back with excessive rudder.
Maintain coordinated flight.
If the approach cannot be safely stabilized,
go around rather than creating
a skidding, high-angle-of-attack turn close to
the ground.
Ready to Continue?
You should now be able to explain
why a wing stalls, how to recognize an approaching
stall, how to enter and recover from one, and why
uncoordinated stalls close to the ground are particularly
dangerous.
If one answer is unclear, review that section before moving on.