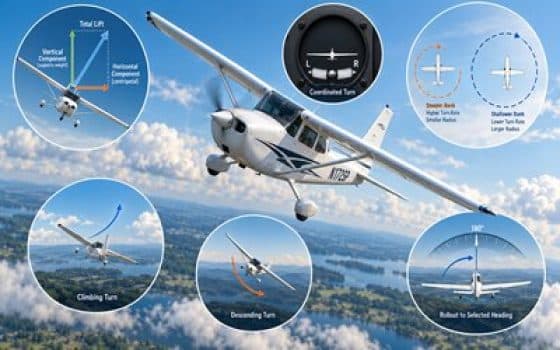
This practical pre-flight lesson prepares you to enter, maintain and leave an aircraft turn with your flight instructor. You will learn how to turn to a selected heading, how to keep the airplane coordinated, and how level, climbing and descending turns are different.
What is an aircraft turn?
An aircraft turn is a basic maneuver used to change the airplane's heading. Instead of continuing straight ahead, the airplane changes direction toward a new heading.
A turn changes the airplane's heading
During a turn, the airplane follows a curved flight path until it reaches the direction you want.
A turn allows you to change from one heading to another.
Turns are used throughout a flight to follow a route and change direction when required.
Turns are also used in the traffic pattern as you move from one leg to the next.
You will learn more than simply moving the controls
You will learn how to enter a turn, maintain it, keep the airplane coordinated and roll out on a selected heading.
Later in the lesson, you will also compare level, climbing and descending turns.
Turns build on skills you already know
Before learning the complete turn procedure, you should already understand bank attitude and how to maintain straight-and-level flight.
Review bank attitude, roll and the basic aircraft movements used to establish a turn.
Review Aircraft Attitude → Foundation Lesson Straight-and-Level FlightReview pitch, heading, airspeed and trim before learning how to move from straight flight into a turn.
Review Straight-and-Level Flight →Why does an airplane turn?
An airplane turns because banking changes the direction of lift. When the wings are banked, part of the lift acts sideways and changes the airplane's flight path.
What happens to lift when the airplane banks?
In straight-and-level flight, lift acts mainly upward.
When the airplane banks, lift acts at an angle instead of straight up. We can think of this lift as having two parts: a vertical component and a horizontal component.
The vertical component helps support the airplane. The horizontal component changes the airplane's flight path and makes it turn.
In a banked turn, lift has a vertical component and a horizontal component.
Lift is divided into vertical and horizontal components
The vertical component helps support the airplane. The horizontal component makes the airplane turn.
Load factor in a turn
Load factor compares the load on the airplane with its weight. It is expressed in G.
Bank angle changes the load factor
In straight-and-level flight, the load factor is normally about 1 G.
In a level turn, part of the lift acts horizontally to make the airplane turn. More total lift is therefore needed to maintain altitude.
As the bank angle increases, the load factor increases.
See how bank angle changes load factor
Move the slider left or right to change the bank angle from 0° to 60°. Watch how the load factor and stall speed change as the bank becomes steeper.
Move the slider to change the bank angle and see how the load factor and stall speed change.
This diagram shows a coordinated level turn. The stall-speed value shows the increase compared with the airplane's 1 G stall speed.
A small bank angle produces only a small increase in load factor.
As the bank angle increases, more total lift is required to maintain altitude.
A higher load factor causes the airplane to stall at a higher airspeed.
Airspeed affects how much load the wing can produce
At low airspeed, the wing cannot produce much extra lift before reaching the critical angle of attack and stalling. This limits how much load factor can be produced.
At higher airspeed, the wing can produce much more lift before it stalls. A sudden or large control input can therefore produce a high load factor very quickly.
At high airspeed, this load can become large enough to exceed the airplane's structural limits.
Load factor increases stall speed
An airplane does not always stall at the same airspeed. When the load factor increases, the stall speed increases.
This is why a steep level turn can produce a stall at an airspeed that would be well above the normal 1 G stall speed.
Types of Turns
Aircraft turns can be classified by their angle of bank and by whether the airplane is maintaining altitude, climbing or descending.
Gentle, Medium and Steep Turns
In a level turn, the airplane changes heading while maintaining altitude. The angle of bank determines how the turn is classified.
A gentle turn uses a shallow bank angle and produces a gradual change of heading.
A medium turn uses a greater bank angle and produces a faster change of heading than a gentle turn.
A steep turn uses a larger bank angle and requires increasingly precise control as load factor and stall speed increase.
Climbing turns are normally made with relatively shallow bank angles while maintaining the required climb attitude, airspeed and coordination.
Descending turns may be gentle, medium or steep while the pilot maintains the desired airspeed, descent path and coordination.
Coordinated, slipping and skidding turns
A turn is coordinated when the airplane is neither slipping nor skidding. The inclinometer, often called the ball, provides a simple way to check coordination.
Centered, inside or outside
When the ball is centered, the turn is coordinated.
In a skid, the ball moves toward the outside of the turn.
In a slip, the ball moves toward the inside of the turn.
The ball shows whether the airplane is coordinated, slipping or skidding.
The airplane is neither slipping nor skidding.
There is too much yaw for the amount of bank.
There is not enough yaw for the amount of bank.
“Step on the ball”
A useful training rule is “step on the ball.” If the ball moves to one side, apply rudder pressure toward that side, as required, to move the ball back toward the center.
The examples below show how this works in both left and right turns.
The ball is on the inside of the turn. There is not enough yaw for the amount of bank.
The ball is on the outside of the turn. There is too much yaw for the amount of bank.
The ball is on the inside of the turn. There is not enough yaw for the amount of bank.
The ball is on the outside of the turn. There is too much yaw for the amount of bank.
Which rudder should you use?
Select a situation to see the ball position and the required rudder correction.
The airplane is coordinated.
No correction is required. Keep the ball centered.
Remember: ball left → left rudder as required; ball right → right rudder as required. Use only enough rudder to restore coordination.
Aileron can produce adverse yaw
When aileron is used to start a roll, the difference in drag between the wings can make the nose yaw in the direction opposite the roll. This is called adverse yaw.
Rudder is used as required to control this yaw and maintain coordination while rolling into or out of a turn.
Avoid a skidding turn near the stall
A skid is particularly dangerous when the airplane is slow and close to the stall. A common example is overshooting the base-to-final turn and using excessive inside rudder to force the nose toward the runway.
Do not try to tighten the turn with rudder. Maintain proper coordination and, if the approach is not satisfactory, go around.
Turn rate and turn radius
Two important characteristics of a turn are its rate and its radius. In a coordinated level turn, both are affected by bank angle and airspeed.
A higher rate of turn means the airplane changes heading more quickly.
A smaller radius means the airplane follows a tighter curved flight path.
Same airspeed → more bank
If airspeed remains the same, increasing the bank angle produces a faster rate of turn and a smaller turn radius.
The airplane changes heading more quickly.
The airplane follows a tighter curved path.
Same bank angle → more airspeed
If the bank angle remains the same, increasing airspeed produces a slower rate of turn and a larger turn radius.
The airplane takes more time to change heading.
The airplane needs more horizontal distance to complete the turn.
| Change | Rate of Turn | Turn Radius |
|---|---|---|
|
More bank Same airspeed |
Increases | Decreases |
|
Less bank Same airspeed |
Decreases | Increases |
|
Higher airspeed Same bank angle |
Decreases | Increases |
|
Lower airspeed Same bank angle |
Increases | Decreases |
Do not use this relationship as a reason to make an excessively steep or unusually slow turn. As covered earlier, increasing bank angle also increases load factor and stall speed.
Turn entry
A good turn begins with a smooth, coordinated entry. Start from straight-and-level flight, look outside, then use aileron, rudder and elevator as required to establish the desired bank while maintaining the correct pitch attitude.
Look outside first
Before entering the turn, make sure the airplane is stable in straight-and-level flight and check the area for other aircraft.
Choose the direction of turn and identify the heading or outside reference you intend to use.
Enter the turn smoothly
Keep most of your attention outside while using the instruments to confirm bank, altitude and coordination.
Look carefully in the direction of the turn and around the airplane before changing heading.
Move the ailerons smoothly in the direction of the turn. The airplane begins to roll toward the desired bank angle.
Use rudder as required during the roll to counter adverse yaw and keep the airplane coordinated. Do not simply apply a fixed amount of rudder.
Use elevator pressure as required to maintain the appropriate pitch attitude as the airplane enters the turn.
As the desired bank angle is reached, smoothly reduce the aileron input toward neutral. This stops the rolling motion while allowing the airplane to remain at the selected bank angle.
Check that the bank angle is correct, the ball is centered, the pitch attitude is stable and the airplane is turning smoothly.
Coordinate the controls during the roll
When entering a turn, use aileron to start the roll and rudder as required to counter adverse yaw and keep the airplane coordinated.
The rudder does not establish the bank or make the airplane turn. Its job is to control yaw while the ailerons roll the airplane. If the ball remains centered, the airplane is properly coordinated.
As the desired bank angle is reached, smoothly reduce the aileron input toward neutral and reduce the rudder input used during the roll.
Use the natural horizon to judge the bank angle and pitch attitude as the airplane rolls into the turn.
Briefly check the attitude indicator, altimeter and inclinometer to confirm what you see outside.
Do not hold aileron throughout the turn
The ailerons are used primarily to start and stop the roll. As the airplane approaches the desired bank angle, smoothly reduce the aileron input toward neutral. This slows the roll and prevents the bank angle from continuing to increase.
When the desired bank angle is reached, the ailerons are normally close to neutral. The airplane remains banked; neutralizing the ailerons stops the rolling motion, it does not automatically level the wings.
Use small aileron corrections as required to maintain the selected bank angle, and relax the coordinated rudder input as the roll stops.
During the turn
Once the desired bank angle is established, the objective is to maintain a steady bank, the correct pitch attitude, a constant altitude and proper coordination while continuing to look outside.
Hold a stable picture outside
Use the horizon as your primary reference and make only small control corrections. Brief instrument checks confirm that the airplane is doing what you expect.
Once the selected bank angle is established, keep the ailerons close to neutral and use only small corrections as required to prevent the bank from increasing or decreasing.
Use elevator pressure as required to keep the correct pitch attitude and maintain altitude.
Keep the ball centered. Use small rudder corrections only as required to maintain coordinated flight.
The nose should move steadily around the horizon without continuously rising or falling. Continue scanning for traffic throughout the turn.
Use brief instrument glances to confirm altitude, airspeed, bank angle, rate of turn and coordination, then return your attention outside.
Use the dashboard and horizon
During a stable turn, the position of the dashboard relative to the natural horizon gives you an immediate visual indication of both bank angle and pitch attitude.
As the bank angle becomes steeper, the angle between the dashboard and the horizon becomes greater.
More elevator pressure may be required
In a level turn, part of the airplane's lift is being used to turn the airplane. As bank angle increases, more total lift is required to maintain altitude.
This normally requires additional back pressure on the elevator to maintain the required pitch attitude and altitude.
The nose moves smoothly and steadily around the horizon.
The bank angle remains stable with only small aileron corrections.
The inclinometer remains centered when the turn is properly coordinated.
Confirm the turn — do not fly the instruments alone
After establishing the visual picture outside, use short instrument glances to confirm that the turn is stable.
In a properly maintained level turn, you should see a steady altitude, appropriate airspeed, a stable bank, a steady rate of turn and a centered ball.
The instruments are a cross-check. Return your attention outside after each brief scan.
If altitude begins to decrease or increase, correct the pitch attitude smoothly and then recheck outside.
A significant airspeed change may indicate a change in pitch, power or both.
A stable bank angle and airspeed produce a relatively steady rate of turn.
A displaced ball indicates a slip or skid and requires a coordination correction.
Sit upright and keep a consistent viewpoint
Sit comfortably upright and avoid shifting your body position during the turn.
Moving your head or changing your seating position changes the way the horizon appears relative to the airplane. This can make it harder to judge bank angle and pitch attitude.
A stable posture also helps prevent tense or abrupt control inputs.
Do not chase the instruments
A common mistake is to spend too much time looking inside and react to every small instrument movement.
Establish the correct picture outside first, make small smooth corrections, and use the instruments to confirm the result.
Turn recovery and rollout
To leave a turn accurately, begin the rollout before reaching the desired heading. Use coordinated aileron and rudder to bring the wings level, while maintaining the correct pitch attitude.
Return smoothly to straight-and-level flight
Look outside, anticipate the desired heading and begin leveling the wings early enough to complete the rollout on the selected heading.
Check for traffic and identify the heading or outside reference on which you want to complete the turn.
Do not wait until the nose reaches the desired heading. Begin the rollout early enough for the wings to become level as the airplane reaches the selected heading.
Smoothly apply aileron opposite the direction of the turn to start rolling the wings back toward level.
Use rudder as required with the aileron to control adverse yaw and keep the airplane coordinated during the rollout.
Adjust elevator pressure as required while the wings are returning to level so that the airplane maintains the desired pitch attitude and altitude.
As the wings approach level, smoothly reduce the aileron and rudder inputs toward neutral to stop the rolling motion.
Confirm that the wings are level and the airplane is established on the desired heading. Re-establish straight-and-level flight and trim if required.
Begin before the desired heading
The airplane continues changing heading while the wings are rolling toward level. If you wait until the exact desired heading before starting the rollout, you will normally overshoot the heading.
The faster the airplane is turning, the more anticipation is normally required.
Start the rollout about half the bank angle before the heading
A common training approximation is to begin the rollout when the number of degrees remaining to the desired heading is about half the bank angle.
This is only a rough rule of thumb. The correct lead depends on the rate of turn, airspeed, airplane response and how quickly you roll the wings level. Adjust as required to finish the rollout accurately.
Roll out on heading 075°
Suppose you are in a turn using approximately 20° of bank and want to roll out on a heading of 075°.
Using the half-bank-angle approximation:
You would begin the rollout at approximately 065°, then adjust the timing as needed so the wings become level close to 075°.
Apply opposite aileron to roll toward wings level, then reduce the input toward neutral as the roll stops.
Use rudder as required during the rollout to control adverse yaw and keep the ball centered.
Adjust elevator pressure as required as the bank angle decreases and the airplane returns to level flight.
Avoid late or abrupt rollouts
Starting too late usually causes the airplane to overshoot the desired heading.
Using excessive aileron may produce an abrupt rollout and make it harder to stop the wings precisely at level.
Ignoring pitch during the rollout may cause the airplane to climb or descend as the bank angle changes.
Finish in stable straight-and-level flight
Once the wings are level, check outside first and confirm that the airplane is on the desired heading. Then briefly verify heading, altitude, airspeed and coordination with the instruments.
Climbing turns
A climbing turn combines a climb with a coordinated turn. The airplane continues to gain altitude while changing heading.
Level turn vs climbing turn
The turn itself is made in the same basic way, but during a climbing turn you must also maintain the correct climb attitude, climb power and climb airspeed.
| Level Turn | Climbing Turn | |
|---|---|---|
| Altitude | Maintain altitude | Gain altitude |
| Pitch | Level-flight attitude | Climb attitude |
| Power | Level-flight power | Climb power |
| Bank | Depends on the type of turn | Normally shallow |
| Airspeed | Level-flight airspeed | Climb airspeed |
| Coordination | Keep the ball centered | Keep the ball centered |
Keep the correct climb attitude and use small elevator corrections as required.
A shallow bank helps the airplane maintain better climb performance.
Keep the power setting required for the climb unless another setting is required for the airplane.
Establish the climb, then add the turn
First establish a stable climb. Then enter a shallow, coordinated turn while maintaining the correct climb airspeed.
Set the correct climb attitude, climb power and climb airspeed.
Look outside and check carefully in the direction of the turn.
Use smooth aileron input in the direction of the turn. Use rudder as required to keep the airplane coordinated.
As the desired bank angle is reached, reduce the aileron input toward neutral and stop the roll.
Maintain the climb and the bank
Keep the bank angle steady with small aileron corrections.
Use elevator as required to maintain the correct climb attitude and climb airspeed.
Use rudder as required to remain coordinated and continue looking outside for traffic.
Use small aileron corrections to maintain the selected bank angle.
Use pitch to maintain the correct climb airspeed.
Use rudder as required to keep the climbing turn coordinated.
More bank means less climb performance
When the airplane is banked, some of the lift is used to turn the airplane.
As the bank angle increases, the airplane will normally climb more slowly. This is why climbing turns are usually made with a shallow bank.
Expect a lower rate of climb
At the same power setting and airspeed, the airplane will normally climb more slowly in a climbing turn than in a straight climb.
Do not simply raise the nose to try to maintain the same rate of climb. This can reduce airspeed. Maintain the correct climb airspeed.
Review the Complete Climb Procedure
The Aircraft Climb lesson explains normal climbs, climb airspeeds, pitch and power control, coordination and the complete level-off procedure.
Roll wings level and continue climbing
If you want to stop the turn but continue climbing, keep the climb established while rolling the wings level.
Begin the rollout before the desired heading, just as you would in a level turn.
Apply aileron toward wings level and use rudder as required to maintain coordination.
As the wings approach level, reduce the aileron and rudder inputs toward neutral.
Maintain climb attitude, climb power and climb airspeed. The airplane now continues climbing straight ahead.
What if the turn and the climb must both end?
Think of the heading and the altitude as two separate targets.
The heading tells you when to begin the rollout. The altitude tells you when to begin the level-off.
If the rollout point comes first, roll the wings level and continue climbing straight ahead.
Level off later when you approach the selected altitude.
If the level-off point comes first, level off while remaining in the turn.
You are now in a level turn. Continue until it is time to roll out on the selected heading.
If the rollout point and level-off point arrive at about the same time, begin both actions together.
Roll toward wings level while completing the normal level-off procedure.
Climbing toward 3,000 ft and heading 090°
Imagine you are climbing toward 3,000 ft while turning toward 090°.
If the rollout point for 090° comes first, roll the wings level and continue climbing to 3,000 ft.
If the level-off point for 3,000 ft comes first, level off while continuing the turn. Then roll out when you reach the rollout point for 090°.
Keep the maneuver simple
Too much bank: this reduces climb performance and increases load factor.
Raising the nose to maintain the rate of climb: this can cause the airspeed to decrease.
Confusing heading and altitude: the heading determines when to roll out. The altitude determines when to level off.
Descending turns
A descending turn combines a descent with a coordinated turn. The airplane continues to lose altitude while changing heading.
Level turn vs descending turn
The basic turn technique is the same, but during a descending turn you must also maintain the correct descent attitude, airspeed and rate of descent.
| Level Turn | Descending Turn | |
|---|---|---|
| Altitude | Maintain altitude | Lose altitude |
| Pitch | Level-flight attitude | Descent attitude |
| Power | Level-flight power | Power required for the descent |
| Bank | Depends on the type of turn | Depends on the maneuver |
| Airspeed | Level-flight airspeed | Descent airspeed |
| Coordination | Keep the ball centered | Keep the ball centered |
Use the correct descent attitude and make small elevator corrections as required.
Use the bank angle required for the maneuver and keep it steady with small corrections.
Adjust power as required for the desired rate of descent.
Establish the descent, then add the turn
First establish a stable descent. Then enter a coordinated turn while maintaining the correct descent airspeed.
Set the correct descent attitude, power and airspeed.
Look outside and check carefully in the direction of the turn.
Use smooth aileron input in the direction of the turn. Use rudder as required to keep the airplane coordinated.
As the desired bank angle is reached, reduce the aileron input toward neutral and stop the roll.
Maintain the descent and the bank
Keep the bank angle steady with small aileron corrections.
Use elevator as required to maintain the correct descent attitude and airspeed.
Use rudder as required to remain coordinated and continue looking outside for other aircraft.
Use small aileron corrections to maintain the selected bank angle.
Use pitch to maintain the correct descent airspeed.
Use rudder as required to keep the descending turn coordinated.
The airplane may descend faster in a turn
When the airplane is banked, some of the lift is used to turn the airplane.
At the same power setting and airspeed, the airplane will normally descend faster than in a straight descent.
Adjust the rate of descent
Once the descent attitude and airspeed are stable, adjust power as required for the desired rate of descent.
Add power as required to reduce the rate of descent while maintaining the correct airspeed.
Reduce power as required if a greater rate of descent is needed.
Review the Complete Descent Procedure
The Aircraft Descending lesson explains descent attitude, airspeed control, power, rate of descent and the complete level-off procedure.
Roll wings level and continue descending
If you want to stop the turn but continue descending, keep the descent established while rolling the wings level.
Begin the rollout before the desired heading.
Apply aileron toward wings level and use rudder as required to maintain coordination.
As the wings approach level, reduce the aileron and rudder inputs toward neutral.
Maintain the correct descent attitude, power and airspeed. The airplane now continues descending straight ahead.
What if the turn and the descent must both end?
Think of the heading and the altitude as two separate targets.
The heading tells you when to begin the rollout. The altitude tells you when to begin the level-off.
If the rollout point comes first, roll the wings level and continue descending straight ahead.
Level off later when you approach the selected altitude.
If the level-off point comes first, level off while remaining in the turn.
You are now in a level turn. Continue until it is time to roll out on the selected heading.
If the rollout point and level-off point arrive at about the same time, begin both actions together.
Roll toward wings level while completing the normal level-off procedure.
Descending toward 2,000 ft and heading 180°
Imagine you are descending toward 2,000 ft while turning toward 180°.
If the rollout point for 180° comes first, roll the wings level and continue descending to 2,000 ft.
If the level-off point for 2,000 ft comes first, level off while continuing the turn. Then roll out when you reach the rollout point for 180°.
Watch airspeed and descent rate
Letting the nose drop: this can cause the airspeed and rate of descent to increase.
Ignoring the effect of bank: the airplane may descend faster after the turn is established.
Using rudder to tighten the turn: do not try to increase the turn with rudder alone. Keep the airplane coordinated.
Confusing heading and altitude: the heading determines when to roll out. The altitude determines when to level off.
Airplane Maneuvers Mastery — Private Pilot
Pilot Institute's Airplane Maneuvers Mastery course provides additional training on private pilot maneuvers, including aircraft turns, with practical flight demonstrations.
View the Training Course →Paid training course. Affiliate link — StudyFlight may earn a commission from qualifying purchases at no additional cost to you.
Review questions
Before the flight, make sure you can explain the main ideas and procedures without looking back at the lesson.
1. Why does an airplane turn when it is banked?
When the airplane is banked, part of the lift acts sideways. This changes the airplane's direction and makes it turn.
2. What happens to load factor as bank angle increases in a level turn?
Load factor increases. A higher load factor also increases stall speed.
3. At the same airspeed, what happens to turn rate and turn radius when bank angle increases?
The rate of turn increases and the turn radius becomes smaller.
4. At the same bank angle, what happens when airspeed increases?
The rate of turn decreases and the turn radius becomes larger.
5. What does a centered ball tell you during a turn?
A centered ball indicates that the airplane is coordinated and is neither slipping nor skidding.
6. Why is rudder used while rolling into or out of a turn?
Rudder is used as required to control adverse yaw and maintain coordination while the ailerons roll the airplane.
7. What happens when you move the ailerons back toward neutral after reaching the desired bank angle?
The rolling motion stops. The airplane remains banked. Returning the ailerons toward neutral does not automatically level the wings.
8. Where should most of your attention be during a visual turn?
Primarily outside the airplane. Use the horizon to judge pitch and bank, continue looking for traffic, and use brief instrument checks to confirm the turn.
9. Why must you begin the rollout before reaching the desired heading?
The airplane continues changing heading while the wings are rolling toward level. Starting the rollout early helps the airplane finish the turn on the desired heading.
10. What rough rule can be used to estimate when to begin the rollout?
A useful starting point is to begin the rollout when the heading remaining is approximately half the bank angle. This is only a rough rule and must be adjusted as needed.
11. You are using 20° of bank and want to roll out on heading 075°. Using the half-bank-angle rule, approximately when should you begin the rollout?
Half of 20° is 10°. Begin the rollout approximately 10° before 075°, at about 065°.
12. Why are climbing turns normally made with a shallow bank?
A larger bank uses more lift to turn the airplane and normally reduces climb performance.
13. If you roll the wings level during a climbing turn, does the climb automatically stop?
No. Rolling the wings level stops the turn. If the climb attitude and climb power are maintained, the airplane continues climbing straight ahead.
14. If both heading and altitude must be reached during a climbing or descending turn, which action comes first?
It depends on which target comes first. The heading determines the rollout, while the altitude determines the level-off.
15. Why may the rate of descent increase during a descending turn?
When the airplane is banked, some of the lift is used to turn the airplane. At the same power and airspeed, the airplane will usually descend faster than in a straight descent.
16. What should you do if the airplane is descending too quickly during a descending turn?
Add power as required while maintaining the correct descent airspeed and coordination.
Review descent attitude, airspeed, power, rate of descent and leveling off.
Learn how wind can change the airplane's movement over the ground and create misleading visual impressions during turns.